はじめに
Semantic Kernel は GPT などの AI モデルの呼び出しと C# や Java, Python のコードを統合して使用することができる Microsoft 製のオープンソース SDK です。2023年4月にプレビューを開始し、12月には Version 1.0.1 として正式リリースされました。そして7ヶ月が経過した2024年7月の現時点で Version 1.15.x がリリースされていることからもわかる通り、非常に早いペースで機能追加・改善が進んでいます。
Semantic Kernel が目指す方向性は当初から何も変わっていませんが、正式リリースからまだ1年も経っていないにも関わらず2024年2,3月頃から概念が大きく変わってしまいました。MS Learn もその新しい概念に合わせるように少しずつ更新されていましたが、2024年6月末頃、ようやく完全に対応したバージョンとなりました。そのため、「Semantic Kernel」で Web 検索して表示されるブログなどの情報と、 MS Learn で説明している内容が異なってしまっており混乱の元となっています。
この記事は 2024年7月時点での最新の Semantic Kernel について、概念から使用方法までを改めて説明するものです。今までの Semantic Kernel のリリーススピードを鑑みると、この記事もすぐに古いものになってしまうでしょう。常に最新の情報を常に取得するよう、お願い致します。
なぜ Semantic Kernel が必要なのか
まず最初に Semantic Kennel の方向性について確認しておきましょう。この方向性は当初から何も変更されていませんが、MS Learn からは読み取りづらいところもあるので改めて記載しておきます。
AI モデルを呼び出す時に、情報の追加取得を行うなどの機能補強のための SDK は Semantic Kernel だけではありません。代表的なものは LangChain でしょう。では、どうして Microsoft は Semantic Kernel を作ろうと思ったのでしょうか。それは次の3つが理由です。
1. ネイティブコード/WebAPI とモデルのオーケストレーション
Semantic Kernel には Plugin という概念があります。詳しくは下で説明しますが、Plugin が目指すのはネイティブコードや WebAPI を AI モデルとともに自動的に使用されるようにすることです。
例えば現在日を返すメソッドを用意し、プロンプトで「今日は何日?」と聞くと、ちゃんと今日の日付が返ってくる、という感じです。ご存知の通り、生成 AI モデルは学習に使用されたデータ以降の情報やリアルタイム性のある結果を生成することができません。でもネイティブコードで用意したメソッドを呼び出すことで情報を補うようにすれば、得たい結果をちゃんと得ることができます。ポイントはネイティブコードの呼び出しは Semantic Kernel がやってくれる点です。開発者はいつものようにメソッドを実装するだけなのでとても直感的です。
そのネイティブコードのプログラミング言語として、C#, Java, Pythonの3つの言語を使用できるのが Semantic Kernelの大きな特徴の1つです。C#、Java は改めて説明の必要はありませんが、エンタープライズアプリケーションを実装するときにとても良く使用されている言語です。いつも使っている言語で AI アプリケーションを作成できるのはとても大きなメリットです。またAI、機械学習といえば Python がとてもよく使われることもあるからでしょう、 Python のサポートもかなり積極的に行っています。そしてこの3つの言語用の SDK は実装モデルがほぼ同じなため、他言語用の実装でもソースが読みやすくなっています。
2. エンタープライズアプリケーションのための SDK
Semantic Kernel は生成 AI の研究を目的としていません。生成 AI を使ってエンタープライズアプリケーションを作成する場合に必要な機能を備えることを目的としています。Microsoft はエンタープライズアプリケーションとして生成 AI を使用する場合、色々なチェックが必要になる、と考えています。例えば、自動的に呼び出されるネイティブコードや WebAPI に対して引数は何を渡しているのか。また何回同じメソッドを呼び出しているのか、チェックが必要です。というのも、自動的に呼び出す、と言うことは呼び出しがループしてしまう可能性があるからです。またプロンプトを動的に作成する場合もあるでしょう。どのようなプロンプトが生成されたのか、後でチェックできるようにしておく必要もあります。Semantic Kernel はそのようなチェックを簡単に入れられるような仕掛けがあらかじめ用意されています。
具体的には Filter (Java の場合は Hooks)の実装をすることになります。後ほどご紹介します。
3. あらゆる AI モデルを使用可能とする抽象化
生成 AI は OpenAI が発表した GPT モデルの精度の高さから大変な盛り上がりを見せていますが、それから様々な企業や団体からも 生成 AI モデルが発表されています。例えば Hagging Face や Llama, Gemini, Mistral などがありますが、Semantic Kernel はそんな様々な 生成 AI を等しく扱うことができます。もちろん AI モデルによってパラメータが異なるので全く同じというわけにはいきませんが、ほぼ同じように扱えるのです。これはアプリケーションにとても大きな柔軟性を与えます。
扱えるのは LLM だけではありません。2024年の春に SLM として Microsoft からリリースされた Phi-3 というモデルがあります。これはオフラインでも稼働する AI モデルです。次元数が小さい割に精度が高く、パフォーマンスがとても良いのが特徴です。Semantic Kernel はこの Phi-3 も扱うことができます。
そんな SLM と LLM はどちらかだけを使うのではなく、組み合わせて使用できると最高でしょう。
- 精度はそこそこだけで高パフォーマンスが必要な処理は SLM
- パフォーマンスを多少犠牲にしてでも高い精度の結果が必要な処理は LLM
と一つの アプリケーションの中で、処理に応じて使い分けることができるとしたらどうでしょうか。Semantic Kernel はこれを実現できるのです。
まずは簡単な コード を見てみよう
Semantic Kernel の存在理由はなんとなくわかったところで、実際の使い方をまずは見てみましょう。Semantic Kernel の実装は実にシンプルなので、概念を知るよりも先に実装と動作を見たほうが理解が早いです。
最もシンプルな実装
まずはコードをご覧ください。C#とJavaで同等のコードを用意しました。シンプルなコンソールアプリケーションです。C#、Java のどちらかをご確認ください。この記事では言及がない限り LLM は Azure OpenAI Service の GPT-4o を使用しています。
C#
Semantic Kernel の SDK を Nuget でインストールします。
  <ItemGroup>
	<PackageReference Include="Microsoft.SemanticKernel" Version="1.15.1" />
  </ItemGroup>
Program.csに以下の実装をします。
using Microsoft.SemanticKernel;
using Microsoft.SemanticKernel.ChatCompletion;
using Microsoft.SemanticKernel.Connectors.OpenAI;

var builder = Kernel.CreateBuilder()
    .AddAzureOpenAIChatCompletion(
        deploymentName: "<YOUR_MODEL_ID>",
        endpoint: "<YOUR_ENDPOINT_NAME>",
        apiKey: "<YOUR_APIKEY>"
        );

Kernel kernel = builder.Build();
var chatCompletionService = kernel.GetRequiredService<IChatCompletionService>();

OpenAIPromptExecutionSettings openAIPromptExecutionSettings = new()
{
    ToolCallBehavior = ToolCallBehavior.AutoInvokeKernelFunctions
};

var history = new ChatHistory();

string? userInput;
do
{
    Console.Write("User > ");
    userInput = Console.ReadLine();

    if (string.IsNullOrEmpty(userInput))
    {
        continue;
    }

    history.AddUserMessage(userInput);

    var result = await chatCompletionService.GetChatMessageContentAsync(
        history,
        executionSettings: openAIPromptExecutionSettings,
        kernel: kernel);

    Console.WriteLine("Assistant > " + result);

    // Add the message from the agent to the chat history
    history.AddMessage(result.Role, result.Content ?? string.Empty);
} while (userInput is not null);
Java
Semantic Kernel の SDK をインストールします。
    <dependencies>
        <dependency>
            <groupId>com.microsoft.semantic-kernel</groupId>
            <artifactId>semantickernel-api</artifactId>
            <version>1.1.5</version>
        </dependency>
        <dependency>
            <groupId>com.microsoft.semantic-kernel</groupId>
            <artifactId>semantickernel-aiservices-openai</artifactId>
            <version>1.1.5</version>
        </dependency>
    </dependencies>
実装は Main.java に全て行います。言うまでもないと思いますが、package はご自身が作成した環境に合わせて変更してください。
package com.microsoft;

import java.util.Scanner;

import com.azure.ai.openai.OpenAIAsyncClient;
import com.azure.ai.openai.OpenAIClientBuilder;
import com.azure.core.credential.AzureKeyCredential;
import com.microsoft.semantickernel.Kernel;
import com.microsoft.semantickernel.orchestration.InvocationContext;
import com.microsoft.semantickernel.orchestration.ToolCallBehavior;
import com.microsoft.semantickernel.services.chatcompletion.ChatCompletionService;
import com.microsoft.semantickernel.services.chatcompletion.ChatHistory;

public class Main {
    public static void main(String[] args) {

        final OpenAIAsyncClient client = new OpenAIClientBuilder()
                .endpoint("<YOUR_ENDPOINT>")
                .credential(new AzureKeyCredential("<YOUR_APIKEY>"))
                .buildAsyncClient();

        ChatCompletionService chatCompletionService = ChatCompletionService.builder()
                .withModelId("<YOUR_MODEL_ID>")
                .withOpenAIAsyncClient(client)
                .build();

        Kernel kernel = Kernel.builder()
                .build();

        ChatHistory history = new ChatHistory();

        // Start the conversation
        System.out.print("User > ");
        Scanner scanner = new Scanner(System.in);
        String userInput;
        while (!(userInput = scanner.nextLine()).isEmpty()) {
            history.addUserMessage(userInput);

            // Enable auto function calling
            var invocationContext = InvocationContext.builder()
                    .withToolCallBehavior(ToolCallBehavior.allowAllKernelFunctions(true))
                    .build();

            // Get the response from the AI
            var reply = chatCompletionService.getChatMessageContentsAsync(
                    history,
                    kernel,
                    invocationContext)
                    .block();

            String message = reply.get(reply.size() - 1).getContent();
            System.out.println("Assistant > " + message);

            // Add the message from the agent to the chat history
            history.addAssistantMessage(message.toString());

            // Get user input again
            System.out.print("User > ");
        }

        scanner.close();
    }
}
<YOUR_MODEL_ID>、<YOUR_ENDPOINT>、<YOUR_APIKEY>には環境に合わせて値をセットしてください。実行してみると、生成 AI とチャットができます。
C# と Java では少しだけ実装が違うように見えますが、やっていることは同じです。
- Kernel オブジェクトを作る
- ChatCompletionService オブジェクトを作る
そして ChatCompletionService の GetChatMessageContentAsync メソッドに
- Kernel オブジェクト
- 会話履歴 オブジェクト(
- 実行時のオプション オブジェクト
を渡すことで AI モデルが生成した文字列を得ています。次の箇所です。
C#
    var result = await chatCompletionService.GetChatMessageContentAsync(
        history,
        executionSettings: openAIPromptExecutionSettings,
        kernel: kernel);
Java
    var reply = chatCompletionService.getChatMessageContentsAsync(
            history,
            kernel,
            invocationContext)
            .block();
とても簡単ですね。でも、この実装はあくまでも素の AI モデルとのチャットでしかありません。これだけだったら Semantic Kernel を使う必要はないでしょう。では次に AI モデルとネイティブコードを Plugin として組み合わせて自動的にコードを呼び出すようにしてみましょう。
最もシンプルな Plugin を作ってみよう
では一番シンプルな Plugin としてよく例示される、現在日時を返す Plugin を作って AI モデルに使わせてみましょう。
ここでは Plugins フォルダの中に Plugin を作ることにします。
C#
まずは DateTimePlugin.cs というファイルを作成し、DateTimePlugin クラスに現在日時を返すメソッドを実装します。
namespace ConsoleAppForBlog.Plugins;

internal class DateTimePlugin
{
    public async Task<string> GetCurrentDateAsync()
    {
        return DateTime.Now.Date.ToString("yyyy/MM/dd HH:mm:ss");
    }
}
別になんてことない実装ですね。次のこのメソッドを Plugin にします。といっても属性を付けるだけです。
namespace ConsoleAppForBlog.Plugins;
+ using Microsoft.SemanticKernel;
+ using System.ComponentModel;

internal class DateTimePlugin
{
+   [KernelFunction("get_current_date")]
+   [Description("Get current date and time")]
+   [return: Description("Return current date and time with formatting conventions of the current culture")]
    public async Task<string> GetCurrentDateAsync()
    {
        return DateTime.Now.Date.ToString("yyyy/MM/dd HH:mm:ss");
    }
}
追加した属性には Plugin 名、 Plugin の説明、オプションとして戻り値の説明を付けました(戻り値の説明はあくまでオプションです)。説明はどちらも日本語ではなく英語の方が精度は良いと思います。
では追加した Plugin を呼び出すように Program.csを修正しましょう。といっても、次の1行を追加するだけです。
・・・
Kernel kernel = builder.Build();

+ kernel.Plugins.AddFromType<DateTimePlugin>();
・・・
全て実装した C# のコードはこちらです。
using Microsoft.SemanticKernel;
using System.ComponentModel;

namespace ConsoleAppForBlog.Plugins;

internal class DateTimePlugin
{
    [KernelFunction("get_current_date")]
    [Description("Get current date and time")]
    [return: Description("Return current date and time with formatting conventions of the current culture")]
    public async Task<string> GetCurrentDateAsync()
    {
        return DateTime.Now.Date.ToString("yyyy/MM/dd HH:mm:ss");
    }
}
using ConsoleAppForBlog.Plugins;
using Microsoft.SemanticKernel;
using Microsoft.SemanticKernel.ChatCompletion;
using Microsoft.SemanticKernel.Connectors.OpenAI;

var builder = Kernel.CreateBuilder()
    .AddAzureOpenAIChatCompletion(
        deploymentName: "YOUR_MODEL_ID",
        endpoint: "YOUR_ENDPOINT",
        apiKey: "YOUR_APIKEY"
        );

Kernel kernel = builder.Build();

kernel.Plugins.AddFromType<DateTimePlugin>();

var chatCompletionService = kernel.GetRequiredService<IChatCompletionService>();

OpenAIPromptExecutionSettings openAIPromptExecutionSettings = new()
{
    ToolCallBehavior = ToolCallBehavior.AutoInvokeKernelFunctions
};

var history = new ChatHistory();

string? userInput;
do
{
    Console.Write("User > ");
    userInput = Console.ReadLine();

    if (string.IsNullOrEmpty(userInput))
    {
        continue;
    }

    history.AddUserMessage(userInput);

    var result = await chatCompletionService.GetChatMessageContentAsync(
        history,
        executionSettings: openAIPromptExecutionSettings,
        kernel: kernel);

    Console.WriteLine("Assistant > " + result);

    // Add the message from the agent to the chat history
    history.AddMessage(result.Role, result.Content ?? string.Empty);
} while (userInput is not null);
Java
まずは DateTimePlugin.java というファイルを作成し、DateTimePlugin クラスに現在日時を返すメソッドを実装します。
package com.microsoft.Plugins;

import java.time.LocalDateTime;
import java.time.format.DateTimeFormatter;

public class DateTimePlugin {

  public static String getCurrentDateTimeString() {
    return LocalDateTime.now().format(DateTimeFormatter.ofPattern("yyyy/MM/dd HH:mm:ss"));
  }
}
別になんてことない実装ですね。次のこのメソッドを Plugin にします。といっても Annotation を付けるだけです。
package com.microsoft.Plugins;

import java.time.LocalDateTime;
import java.time.format.DateTimeFormatter;

+ import com.microsoft.semantickernel.semanticfunctions.annotations.DefineKernelFunction;

public class DateTimePlugin {

+ @DefineKernelFunction(name = "get_current_date", description = "Gets current date and time", returnDescription = "Return current date and time with formatting conventions of the current culture")
  public static String getCurrentDateTimeString() {
    return LocalDateTime.now().format(DateTimeFormatter.ofPattern("yyyy/MM/dd HH:mm:ss"));
  }
}
追加した Annotation には Plugin 名、 Plugin の説明、オプションとして戻り値の説明を付けました(戻り値の説明はあくまでオプションです)。この説明は日本語ではなく英語の方が精度は良いと思います。
では追加した Plugin を呼び出すように Main.java を修正しましょう。
+       var dateTimeplugin = KernelPluginFactory.createFromObject(new DateTimePlugin(), "DateTimePlugin");

        Kernel kernel = Kernel.builder()
+               .withPlugin(dateTimeplugin)
                .build();
全て実装した Java のコードはこちらです。
package com.microsoft.Plugins;

import java.time.LocalDateTime;
import java.time.format.DateTimeFormatter;

import com.microsoft.semantickernel.semanticfunctions.annotations.DefineKernelFunction;

public class DateTimePlugin {

  @DefineKernelFunction(name = "get_current_date", description = "Gets current date and time", returnDescription = "Return current date and time with formatting conventions of the current culture")
  public static String getCurrentDateTimeString() {
    return LocalDateTime.now().format(DateTimeFormatter.ofPattern("yyyy/MM/dd HH:mm:ss"));
  }
}
package com.microsoft;

import java.util.Scanner;

import com.azure.ai.openai.OpenAIAsyncClient;
import com.azure.ai.openai.OpenAIClientBuilder;
import com.azure.core.credential.AzureKeyCredential;
import com.microsoft.Plugins.DateTimePlugin;
import com.microsoft.semantickernel.Kernel;
import com.microsoft.semantickernel.orchestration.InvocationContext;
import com.microsoft.semantickernel.orchestration.ToolCallBehavior;
import com.microsoft.semantickernel.plugin.KernelPluginFactory;
import com.microsoft.semantickernel.services.chatcompletion.ChatCompletionService;
import com.microsoft.semantickernel.services.chatcompletion.ChatHistory;

public class MainForBlog {
  public static void main(String[] args) {

    final OpenAIAsyncClient client = new OpenAIClientBuilder()
        .endpoint("YOUR_ENDPOINT")
        .credential(new AzureKeyCredential("YOUR_APIKEY"))
        .buildAsyncClient();

    ChatCompletionService chatCompletionService = ChatCompletionService.builder()
        .withModelId("YOUR_MODEL_ID")
        .withOpenAIAsyncClient(client)
        .build();

    var dateTimeplugin = KernelPluginFactory.createFromObject(new DateTimePlugin(), "DateTimePlugin");

    Kernel kernel = Kernel.builder()
        .withPlugin(dateTimeplugin)
        .build();

    ChatHistory history = new ChatHistory();

    // Start the conversation
    System.out.print("User > ");
    Scanner scanner = new Scanner(System.in);
    String userInput;
    while (!(userInput = scanner.nextLine()).isEmpty()) {
      history.addUserMessage(userInput);

      // Enable auto function calling
      var invocationContext = InvocationContext.builder()
          .withToolCallBehavior(ToolCallBehavior.allowAllKernelFunctions(true))
          .build();

      // Get the response from the AI
      var reply = chatCompletionService.getChatMessageContentsAsync(
          history,
          kernel,
          invocationContext)
          .block();

      String message = reply.get(reply.size() - 1).getContent();
      System.out.println("Assistant > " + message);

      // Add the message from the agent to the chat history
      history.addAssistantMessage(message.toString());

      // Get user input again
      System.out.print("User > ");
    }

    scanner.close();
  }
}
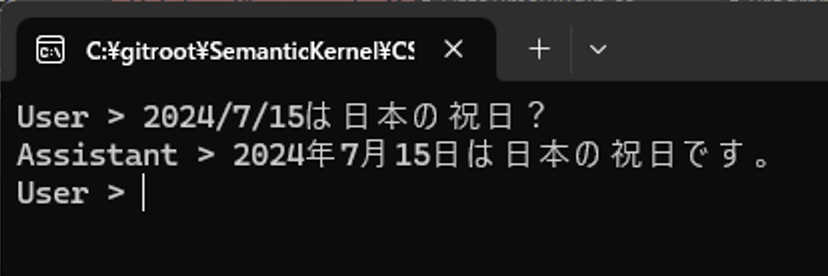
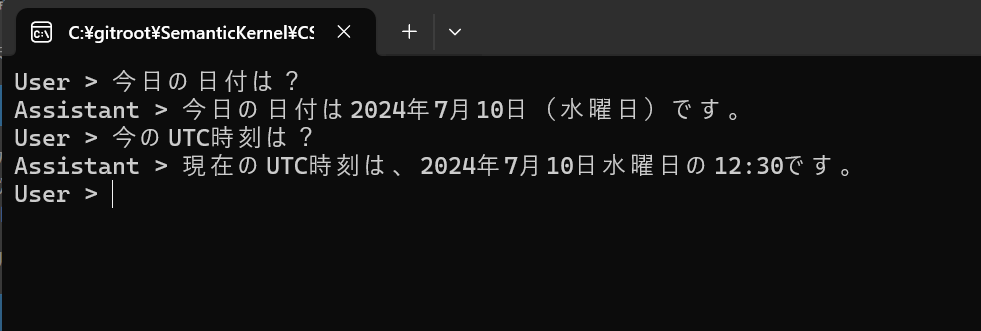
では実行して今日の日時を聞いてみましょう。
Plugin があるのでちゃんと現在の日付を取得して結果を表示しています。ちなみに Plugin がないと次のような結果が返ってきます。
はじめての Plugin はいかがだったでしょうか。ただのメソッドに属性/Annotationを付けて、それを kernel オブジェクトに渡すだけなのです。呆れるほど簡単ですね。
このとてもシンプルな Plugin を作成し、実行してみてわかることは、「今日の日付は?」と聞いたプロンプトを入力しただけで、
- 処理に必要な Plugin を使うことを判定
- Plugin を実行
- Plugin から得られた結果を使って最終的な文章を AI モデルを使って生成
これらを自動的に実行した、ということです。これらを全ての処理を Semantic Kernel が上手いことやってくれました。この3つの処理の1番目、「処理に必要な Plugin を使うことを判定」しているのは、「処理に必要な Plugin を使う判定」を自動的に行うよう指定をしているからです。次の箇所で指定しています。
C#
OpenAIPromptExecutionSettings openAIPromptExecutionSettings = new()
{
    // ここで指定している
    ToolCallBehavior = ToolCallBehavior.AutoInvokeKernelFunctions
};
・・・
    var result = await chatCompletionService.GetChatMessageContentAsync(
        history,
        executionSettings: openAIPromptExecutionSettings, // ここで使っている
        kernel: kernel);
・・・
Java
var invocationContext = InvocationContext.builder
        // ここで指定している
        .withToolCallBehavior(ToolCallBehavior.allowAllKernelFunctions(true))
        .build();

// Get the response from the AI
var reply = chatCompletionService.getChatMessageContentsAsync(
        history,
        kernel,
        invocationContext) /* ここで使っている */
        .block();
C# と Java では全く指定方法が異なっていますが、この指定によってどの Plugin が何回呼び出されるのかが決定されます。後ほど解説しますが、これは新しい概念でいう Plan(計画) に相当します。
Plugin を少し拡張する
1つのクラスに1つのメソッドだけを実装した Plugin を作成しました。メソッドは引数を何も取らず、とてもシンプルなものでした。Plugin として定義したクラスには1つしかメソッドを実装していけない、というわけではありません。複数のメソッドを実装して、それに属性/Annotation を付ければそれらのメソッドを全て Semantic Kernel は認識してくれます。そして、先ほどの日時を返すメソッドには引数がありませんでしたが、メソッドには引数を定義することもできます。
それでは DateTimePlugin に別のメソッドとして、日本の祝日なのかを判定するメソッドを追加してみます。
C#
次のように IsJapaneseHoliday メソッドを追加します。実装してみたら思ったより面倒で長くなってしまいました。
using Microsoft.SemanticKernel;
using System.ComponentModel;

namespace ConsoleAppForBlog.Plugins;

internal class DateTimePlugin
{
    [KernelFunction("get_current_date")]
    [Description("Get current date and time")]
    [return: Description("Return current date and time with formatting conventions of the current culture")]
    public async Task<string> GetCurrentDateAsync()
    {
        return DateTime.Now.Date.ToString("yyyy/MM/dd HH:mm:ss");
    }

    [KernelFunction("get_japanese_holiday")]
    [Description("Determine if it is a holiday in Japan")]
    public bool IsJapaneseHoliday(
        [Description(description:"The year, part of date you want to determine")] string yearString,
        [Description(description: "The month, part of date you want to determine")] string monthString,
        [Description(description: "The day, part of date you want to determine")] string dayString)
    {
        int year = int.Parse(yearString), month = int.Parse(monthString), day = int.Parse(dayString);

        // 固定された日付の祝日
        if ((month == 1 && day == 1) || // 元日
            (month == 2 && (day == 11 || day == 23)) || // 建国記念の日、天皇誕生日
            (month == 4 && day == 29) || // 昭和の日
            (month == 5 && (day >= 3 && day <= 5)) || // 憲法記念日、みどりの日、こどもの日
            (month == 8 && day == 11) || // 山の日
            (month == 11 && (day == 3 || day == 23))) // 文化の日、勤労感謝の日
        {
            return true;
        }

        // 特定の曜日に依存する祝日
        if ((month == 1 && day == GetDayOfSecondMonday(year, 1).Day) || // 成人の日
            (month == 7 && day == GetDayOfThirdMonday(year, 7).Day) || // 海の日
            (month == 9 && day == GetDayOfThirdMonday(year, 9).Day) || // 敬老の日
            (month == 10 && day == GetDayOfSecondMonday(year, 10).Day)) // 体育の日
        {
            return true;
        }

        // 春分の日と秋分の日
        if ((month == 3 && day == GetVernalEquinoxDay(year).Day) || // 春分の日
            (month == 9 && day == GetAutumnalEquinoxDay(year).Day)) // 秋分の日
        {
            return true;
        }

        return false;

    }

    // 春分の日を取得する
    private DateOnly GetVernalEquinoxDay(int year)
    {
        if (year == 2027 || year == 2031 || year == 2035 || year == 2039 || year == 2043 || year == 2047)
        {
            return new DateOnly(year, 3, 21);
        }
        else if (year >= 2025 && year <= 2050)
        {
            return new DateOnly(year, 3, 20);
        }

        // このロジックは正確ではありません
        return new DateOnly(year, 3, (year - 2027) % 4 == 0 ? 21 : 20);
    }

    // 秋分の日を取得する
    private DateOnly GetAutumnalEquinoxDay(int year)
    {
        if (year == 2028 || year == 2032 || year == 2036 || year == 2040 || year == 2044 || year == 2045 || year == 2048 || year == 2049)
        {
            return new DateOnly(year, 9, 22);
        }
        else if (year >= 2025 && year <= 2050)
        {
            return new DateOnly(year, 9, 23);
        }

        // このロジックは正確ではありません
        return new DateOnly(year, 9, (year - 2028) % 4 == 0 ? 22 : 23);
    }


    private DateOnly GetDayOfNthMonday(int year, int month, int nth)
    {
        DateOnly firstDayOfMonth = new DateOnly(year, month, 1);
        int daysUntilMonday = ((int)DayOfWeek.Monday - (int)firstDayOfMonth.DayOfWeek + 7) % 7;
        DateOnly firstMonday = firstDayOfMonth.AddDays(daysUntilMonday);
        return firstMonday.AddDays(7 * (nth - 1));
    }

    private DateOnly GetDayOfSecondMonday(int year, int month)
    {
        return GetDayOfNthMonday(year, month, 2);
    }

    private DateOnly GetDayOfThirdMonday(int year, int month)
    {
        return GetDayOfNthMonday(year, month, 3);
    }
}
ポイントは IsJapaneseHoliday メソッドの3つの引数に指定した Description 属性です。引数には必ず Description 属性をつけて、何を受け取る引数なのかをできるだけ英語で書きましょう。
Java
次のように IsJapaneseHoliday メソッドを追加します。実装してみたら思ったより面倒で長くなってしまいました。
package com.microsoft.Plugins;

import java.time.DayOfWeek;
import java.time.LocalDate;
import java.time.LocalDateTime;
import java.time.format.DateTimeFormatter;
import java.time.temporal.TemporalAdjusters;

import com.microsoft.semantickernel.semanticfunctions.annotations.DefineKernelFunction;
import com.microsoft.semantickernel.semanticfunctions.annotations.KernelFunctionParameter;

public class DateTimePlugin {

  @DefineKernelFunction(name = "get_current_date", description = "Gets current date and time", returnDescription = "Return current date and time with formatting conventions of the current culture")
  public static String getCurrentDateTimeString() {
    return LocalDateTime.now().format(DateTimeFormatter.ofPattern("yyyy/MM/dd HH:mm:ss"));
  }

  @DefineKernelFunction(name = "get_japanese_holiday", description = "Determine if it is a holiday in Japan")
  public static boolean isJapaneseHoliday(
      @KernelFunctionParameter(name = "year", description = "The year, part of date you want to determine") String yearString,
      @KernelFunctionParameter(name = "month", description = "The month, part of date you want to determine") String monthString,
      @KernelFunctionParameter(name = "day", description = "The day, part of date you want to determine") String dayString) {
    // convert paramaters to integer

    int year = Integer.parseInt(yearString);
    int month = Integer.parseInt(monthString);
    int day = Integer.parseInt(dayString);

    // 固定された日付の祝日
    if ((month == 1 && day == 1) || // 元日
        (month == 2 && (day == 11 || day == 23)) || // 建国記念の日、天皇誕生日
        (month == 4 && day == 29) || // 昭和の日
        (month == 5 && (day >= 3 && day <= 5)) || // 憲法記念日、みどりの日、こどもの日
        (month == 8 && day == 11) || // 山の日
        (month == 11 && (day == 3 || day == 23))) // 文化の日、勤労感謝の日
    {
      return true;
    }

    // 特定の曜日に依存する祝日
    if ((month == 1 && day == GetDayOfSecondMonday(year, 1).getDayOfMonth()) || // 成人の日
        (month == 7 && day == GetDayOfThirdMonday(year, 7).getDayOfMonth()) || // 海の日
        (month == 9 && day == GetDayOfThirdMonday(year, 9).getDayOfMonth()) || // 敬老の日
        (month == 10 && day == GetDayOfSecondMonday(year, 10).getDayOfMonth())) // 体育の日
    {
      return true;
    }

    // 春分の日と秋分の日
    if ((month == 3 && day == getVernalEquinoxDay(year).getDayOfMonth()) || // 春分の日
        (month == 9 && day == getAutumnalEquinoxDay(year).getDayOfMonth())) // 秋分の日
    {
      return true;
    }

    return false;
  }

  private static LocalDate getVernalEquinoxDay(int year) {
    if (year == 2027 || year == 2031 || year == 2035 || year == 2039 || year == 2043 || year == 2047) {
      return LocalDate.of(year, 3, 21);
    } else if (year >= 2025 && year <= 2050) {
      return LocalDate.of(year, 3, 20);
    }
    // このロジックは正確ではありません
    return LocalDate.of(year, 3, (year - 2027) % 4 == 0 ? 21 : 20);
  }

  private static LocalDate getAutumnalEquinoxDay(int year) {
    if (year == 2028 || year == 2032 || year == 2036 || year == 2040 || year == 2044 || year == 2045 || year == 2048
        || year == 2049) {
      return LocalDate.of(year, 9, 22);
    } else if (year >= 2025 && year <= 2050) {
      return LocalDate.of(year, 9, 23);
    }
    // このロジックは正確ではありません
    return LocalDate.of(year, 9, (year - 2028) % 4 == 0 ? 22 : 23);
  }

  private static LocalDate getDayOfNthMonday(int year, int month, int nth) {
    LocalDate firstDayOfMonth = LocalDate.of(year, month, 1);
    LocalDate firstMonday = firstDayOfMonth.with(TemporalAdjusters.nextOrSame(DayOfWeek.MONDAY));
    // nthが1の場合はそのまま、それ以外の場合は(nth-1)週分加算
    return firstMonday.plusWeeks(nth - 1);
  }

  private static LocalDate GetDayOfSecondMonday(int year, int month) {
    return getDayOfNthMonday(year, month, 2);
  }

  private static LocalDate GetDayOfThirdMonday(int year, int month) {
    return getDayOfNthMonday(year, month, 3);
  }
}
ポイントは IsJapaneseHoliday メソッドの3つの引数に指定した KernelFunctionParameter アノテーションです。引数には必ず KernelFunctionParameter アノテーションを付けて、何を受け取る引数なのかをできるだけ英語で書きましょう。
C#、Javaともに実行するとこのようにちゃんと Plugin に追加したメソッドを使ってくれます。
このように1つの Plugin に複数のメソッドを実装可能なことがわかりました。そんなのわざわざ説明する必要もなく、そりゃできるだろうな、と思われたことでしょう。もちろんそうなんですけども、ここで kernel オブジェクトに登録された Plugin の中をちょっと覗いてみていただきたいのです。
KernelPlugin と KernelFunction を知ろう
Plugin を定義したクラスには複数のメソッドを実装して、それぞれが Semantic Kernel から呼び出されることがわかりました。Plugin は Kernel オブジェクトに登録するわけですが、どのように Kernel オブジェクト内部で保持されているのかちょっと覗いてみましょう。
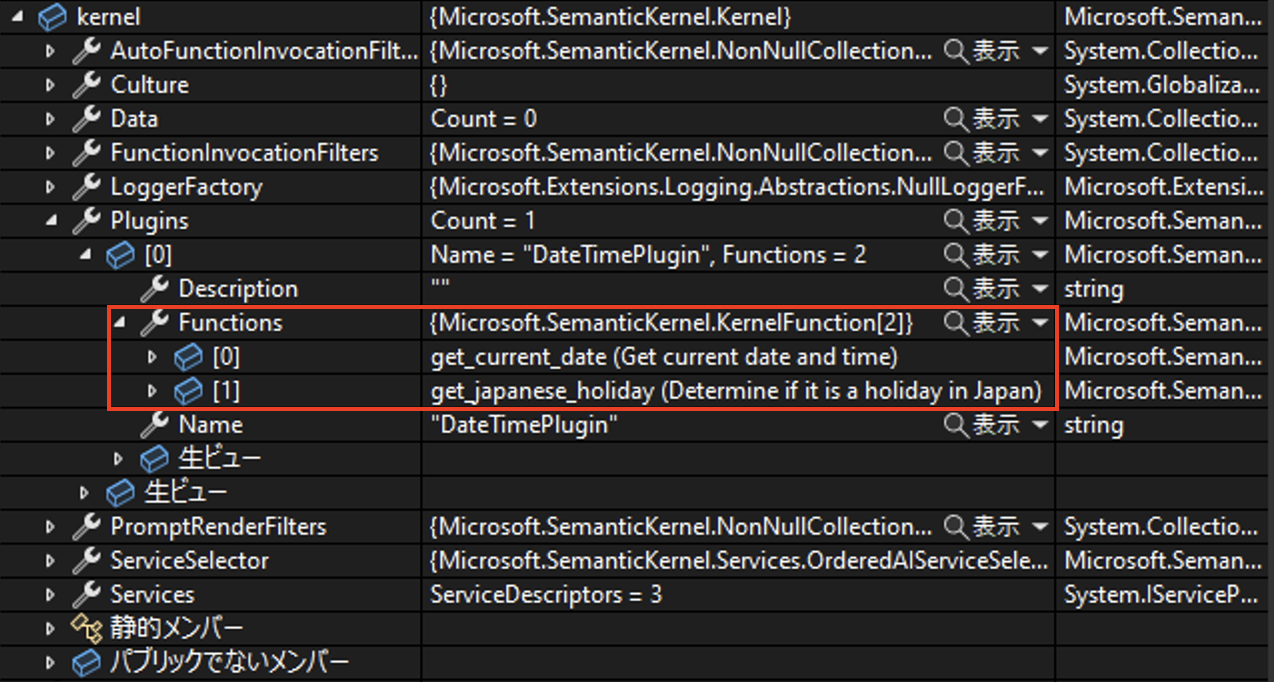
先ほどの C# の実行中にブレイクポイントで止めて kernel オブジェクトを見てみると、次のように表示されます。
Plugin オブジェクトの中に、2つの KernelFunction オブジェクトが格納されていて、それぞれが実装したメソッドであることがわかります。
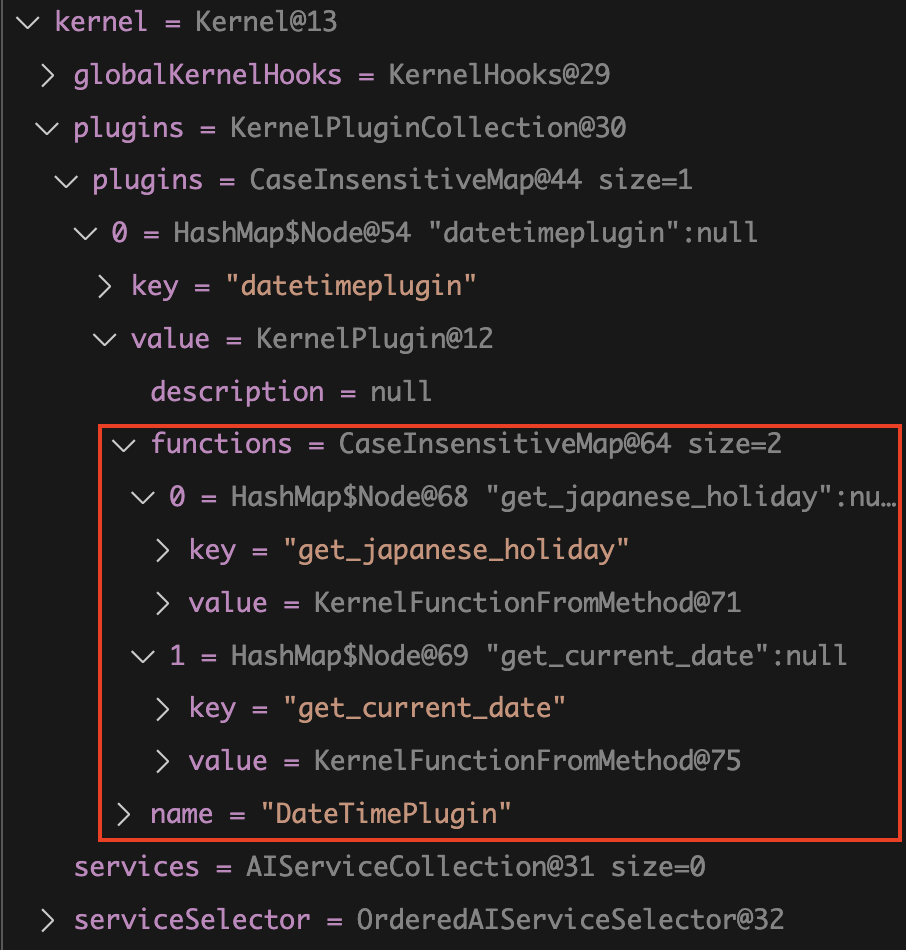
同様に Java の方も見てみましょう。
こちらも全く同じで、2つの KernelFunction オブジェクトが格納されています。
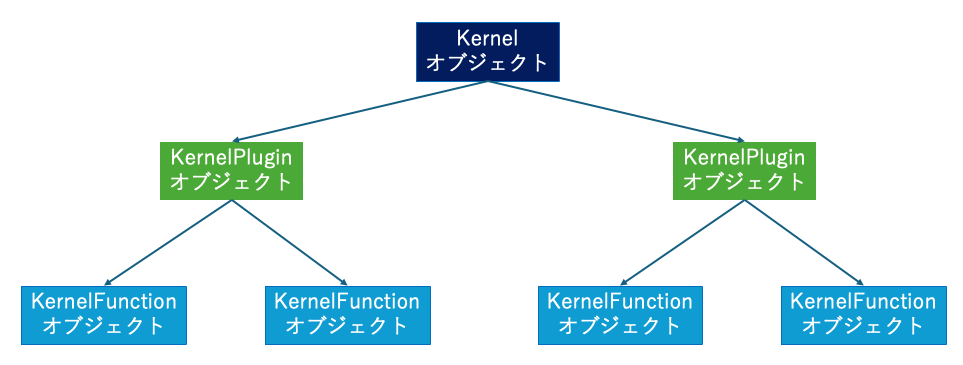
ここからわかるのは、Semantic Kernel から呼び出すことができるメソッドは KernelFunction クラスのオブジェクトとして認識されている、ということです。
さらに Plugin は KernelPlugin クラスのオブジェクトとして kernel が保持しており、またその KernelPlugin オブジェクトが複数の KernelFunction オブジェクトを保持している、という構成になっていることは基礎知識として覚えておきましょう。
チャット形式の UI は万能か?
突然ですが、ここでチャット形式について考察しておきます。この記事では、ここまで AI モデルとのやり取りにはチャット形式を採用しています。しかしながら AI モデルをアプリケーションで使用するシナリオでは、ほとんどの場合 UI はチャット形式である必要がありません。
例えばよくある社内ドキュメントを検索して結果を返す、いわゆる RAG の AI チャットの場合を考えてみましょう。え?そういう時ってチャット形式での UI で作ることがほとんどじゃないの?と思われるでしょう。でも、チャット形式の UI は全くもって必須ではありません。
本来、チャット形式の UI はコンテキストを重視する場合にだけ価値があります。コンテキストを重視するとは、それまでの会話の流れを新しい応答にも影響を与えるようにする、ということです。社内の規定について質問したら答えてくれるAIチャットの場合、通常はコンテキストを重視してドキュメント検索をするようには実装しません。 そのように実装してしまうと、過去のコンテキストを検索に使うことで毎回同じドキュメントばかりが検索結果としてヒットしてしまう可能性があるからです。
つまり、実装上コンテキストを完全無視します。毎回新しい検索を行い、結果を生成します。ですが、そのようにコンテキストを無視するのであれば、チャット形式の UI は採用しない方が良いのです。コンテキストを無視しているのにチャット形式の UI にしてしまうと、ユーザー体験を著しく悪化させる可能性があるからです。
チャット形式の UI を実際に使ってみる時のことを考えてみます。何か問い合わせてみたら、ちょっと違う結果が返ってきたとします。いや、そうじゃなくてこれについて聞きたいんだけど、と再度問い合わせても、1つ前の内容が間違っていた、という条件のもとで検索は行われません。ただ新しく検索されるだけです。全然違う結果となるか、似た結果が返ってきてしまいます。このように会話は流れるように質問しているのに、結果はそうなっていないわけです。ユーザーにとってはそれまでの応答が見えているので、コンテキストを考慮した検索をしてくれるのではないか、と思うのは当然のことです。ところが使ってみるとコンテキストが考慮されません。これはユーザーからすると使い勝手が悪い・・・という感想を持つことになり、次第に誰も使わなくなってしまうのです。
では社内ドキュメントを検索して答えるような AI bot を作る場合はどういう UI が良いでしょうか。これが正解、というのがあるわけではありませんが、例えば質問と応答の履歴は別のエリアに見出しだけ表示するようにして、クリックすると過去の応答が見えるようにしておき、新しい質問と応答はそれぞれ1つだけしか表示しないようにする、という方法があるでしょう。
このように、AI モデルを使用するアプリケーションではチャット形式の UI が採用されがちですが、実際にはコンテキストを考慮しないのであればチャット形式の UI は採用しない方が良い場合の方が多いのです。
AI モデルの挙動を確認する開発時においては、チャット形式で実装をすることはよくあります。それをそのまま本番用の UI にしないで UX を考慮した画面設計にすることがとても重要です。
コンテキストを考慮しない場合の実装
ここまでチャット形式の実装をしてきました。ではコンテキストを考慮しない場合は Sementic Kernel ではどういう実装になるかをご紹介します。その前にChatCompletion 、ChatCompletionService と似たような2つの用語が出てきています。混乱しないようにそれぞれの用語について確認しておきましょう。
- Chat Completion とは OpenAI 社の AI モデルの備える API の名称で、 Chat Completion API はプロンプトに対して会話として成立する文字列だけを生成して返却します。UI がチャット形式の時にだけにしか使わないものではありません。
- ChatCompletionService は Semantic Kernel が用意したクラスで元々は OpenAI 社の ChatCompletion API を使うことを Kernel に指示するためのクラスでした(今も Java SDK ではそのように使用します)。ここまでの使い方は主に次の通りでした。
- 会話履歴 と実行オプションを指定して文章生成を依頼する
コンテキストを考慮しない最もシンプルな実装
まずは最もシンプルな実装を見てみましょう。
C#
using Microsoft.SemanticKernel;

var builder = Kernel.CreateBuilder()
    .AddAzureOpenAIChatCompletion( // ChatCompletion API を使う
        deploymentName: "YOUR_MODEL_ID",
        endpoint: "YOUR_ENDPOINT",
        apiKey: "YOUR_APIKEY"
        );

Kernel kernel = builder.Build();

FunctionResult result = await kernel.InvokePromptAsync("こんにちは!");

Console.WriteLine(result.GetValue<string>());
OpenAI社の ChatCompletion API を使うために、AddAzureOpenAIChatCompletion メソッドを使用するのは今までと同じです。あとは kernel オブジェクトの ImvokePromptAsync メソッドを使ってプロンプトを渡します。
Java
package com.microsoft;

import com.azure.ai.openai.OpenAIAsyncClient;
import com.azure.ai.openai.OpenAIClientBuilder;
import com.azure.core.credential.AzureKeyCredential;
import com.microsoft.semantickernel.Kernel;
import com.microsoft.semantickernel.orchestration.FunctionResult;
import com.microsoft.semantickernel.services.chatcompletion.ChatCompletionService;

public class Main {
    public static void main(String[] args) {

        final OpenAIAsyncClient client = new OpenAIClientBuilder()
                .endpoint("YOUR_ENDPOINT")
                .credential(new AzureKeyCredential("YOUR_APIKEY"))
                .buildAsyncClient();

        // kernel にChatCompletion API を使うことを示すために作成が必要
        ChatCompletionService chatCompletionService = ChatCompletionService.builder()
                .withModelId("YOUR_MODELID")
                .withOpenAIAsyncClient(client)
                .build();

        Kernel kernel = Kernel.builder()
                .withAIService(ChatCompletionService.class, chatCompletionService)
                .build();

        FunctionResult<Object> result = kernel.invokePromptAsync("こんにちは!").block();
        System.out.println(result.getResult());
    }
}
C# の場合は Kernel オブジェクトを作成するときに ChatCompletion を使うことを宣言するためのメソッドがあるのですが、Java では ClientBuilder と KernelBuilder が分離しているので該当するメソッドがありません。Java の場合、Kernel オブジェクトを作成する Builder に ChatCompletionService オブジェクトを渡すことで、 ChatCompletion API を使うことを指定します。いずれ Java SDK も C# と同様のクラス構成になる可能性が高いですが、現在はこのような実装方式です。
ChatCompletionService オブジェクトを渡して Kernel オブジェクトを作成したら、ImvokePromptAsync メソッドを使ってプロンプトを渡します。
実行すると次のようになります。
C#
Java
コンテキストを考慮しない場合でも Plugin が自動的に呼ばれるようにする
最もシンプルな例は確かにシンプルで良いのですが、この実装では Semantic Kernel は Plugin を自動的に呼び出してくれません。Semantic Kernel は Plugin を自動的に呼び出してくれるようにするには、実行時のオプションを指定するオブジェクトを使う必要がある、ということを覚えていますでしょうか。具体的には次の実装です。
// この実行時オプションを使わなければいけない
OpenAIPromptExecutionSettings openAIPromptExecutionSettings = new()
{
    ToolCallBehavior = ToolCallBehavior.AutoInvokeKernelFunctions
};
// この実行時オプションを使わなければいけない
var invocationContext = InvocationContext.builder
    .withToolCallBehavior(ToolCallBehavior.allowAllKernelFunctions(true))
        .build();
しかし、kernel オブジェクトの InvokeAsyc や InvokePromptAsync などの Invoke〜〜メソッドにはこの実行時オプションをそのままでは引数として受け取ることができません。KernelAuguments オブジェクトに一度渡す必要があります。
C#
using Microsoft.SemanticKernel;

var builder = Kernel.CreateBuilder()
    .AddAzureOpenAIChatCompletion( // ChatCompletion API を使う
        deploymentName: "YOUR_MODEL_ID",
        endpoint: "YOUR_ENDPOINT",
        apiKey: "YOUR_APIKEY"
        );

Kernel kernel = builder.Build();

OpenAIPromptExecutionSettings openAIPromptExecutionSettings = new()
{
    ToolCallBehavior = ToolCallBehavior.AutoInvokeKernelFunctions
};

+ var arguments = new KernelArguments(openAIPromptExecutionSettings);

- FunctionResult result = await kernel.InvokePromptAsync("こんにちは!");
+FunctionResult result = await kernel.InvokePromptAsync("こんにちは!", arguments);

Console.WriteLine(result.GetValue<string>());
Java
2024年7月現在、残念ながら Java の SDK では Kernel.InvokePromptAsync に 実行時オプション を受け取るオーバーロードが用意されいません。
もう1つのやり方は ChatCompletionService オブジェクトを使う方法です。
C#
using ConsoleAppForBlog.Plugins;
using Microsoft.SemanticKernel;
using Microsoft.SemanticKernel.ChatCompletion;
using Microsoft.SemanticKernel.Connectors.OpenAI;

// Get Environtment Variables

var builder = Kernel.CreateBuilder()
    .AddAzureOpenAIChatCompletion(
        deploymentName: "YOUR_MODEL_ID",
        endpoint: "YOUR_ENDPOINT",
        apiKey: "YOUR_API_KEY"
        );

Kernel kernel = builder.Build();

kernel.Plugins.AddFromType<DateTimePlugin>("time");

var chatCompletionService = kernel.GetRequiredService<IChatCompletionService>();

#pragma warning disable SKEXP0010
OpenAIPromptExecutionSettings openAIPromptExecutionSettings = new()
{
    ToolCallBehavior = ToolCallBehavior.AutoInvokeKernelFunctions
};

var result = await chatCompletionService.GetChatMessageContentAsync(
    "今日の日付は?",
    executionSettings: openAIPromptExecutionSettings,
    kernel: kernel);

Console.WriteLine(result.ToString());
Java
  public static void main(String[] args) {

    final OpenAIAsyncClient client = new OpenAIClientBuilder()
        .endpoint("YOUR_ENDPOINT")
        .credential(new AzureKeyCredential("YOUR_APIKEY"))
        .buildAsyncClient();

    ChatCompletionService chatCompletionService = ChatCompletionService.builder()
        .withModelId("YOUR_MODEL_ID")
        .withOpenAIAsyncClient(client)
        .build();

    var dateTimeplugin = KernelPluginFactory.createFromObject(new DateTimePlugin(), "DateTimePlugin");

    Kernel kernel = Kernel.builder()
        .withPlugin(dateTimeplugin)
        .build();

    var invocationContext = InvocationContext.builder()
        .withToolCallBehavior(ToolCallBehavior.allowAllKernelFunctions(true))
        .build();

    var reply = chatCompletionService.getChatMessageContentsAsync(
        "今日の日付は?",
        kernel,
        invocationContext)
        .block();

    System.out.print(reply.get(reply.size() - 1).getContent());
チャットの時は ChatCompletionService の GetChatMessageContentAsyncの第一引数に会話履歴オブジェクトを渡しましたが、今度は固定文字列 "今日の日付は?" をプロンプトとして渡しています。
最も原始的な方法として、次のように事前に KernelFunction をプロンプトから作成する、という工程を入れる方法もあります。
//var result = await chatCompletionService.GetChatMessageContentAsync(
//    "今日の日付は?",
//    executionSettings: openAIPromptExecutionSettings,
//    kernel: kernel);

KernelFunction semanticFunction = kernel.CreateFunctionFromPrompt(
    "今日の日付は?", openAIPromptExecutionSettings);

var result = await kernel.InvokeAsync(semanticFunction);

Console.WriteLine(result.ToString());
Kernel kernel = Kernel.builder()
    .withPlugin(dateTimeplugin)
    // 追加
    .withAIService(ChatCompletionService.class, chatCompletionService)
    .build();

KernelFunction<String> semanticFunction = KernelFunctionFromPrompt.<String>builder()
    .withTemplate("今日の日付は?")
    .build();

var reply = kernel.invokeAsync(semanticFunction)
    .withToolCallBehavior(ToolCallBehavior.allowAllKernelFunctions(true))
    .block();

System.out.println(reply.getResult());
この方法は結局、Kernel.InvokePromptAsync の内部挙動を自分で実装しているだけです。Java の場合は Kernel.InvokePromptAsync に 実行時オプション を受け取るオーバーロードの実装が無いので、この方法で実装します。(オーバーロード作って PullRequest 出せば良いのですが)
警告
Kernel.InvokePromptAsyncを使う、もしくはこの事前に KernelFunction を作る方法は ChatCompletionService.GetChatMessageContentsAsync メソッドを使うより原始的ですが、残念ながらこの方法でないとうまく動作しないパターンもあることがわかっています。
- 動的プロンプト生成時の Filter(Hooks)が動作しない
- 動的プロンプトに変数埋め込みをする場合に KernelArguments を渡す方法がない
詳しくはこの後でご説明しています。またあくまで2024年7月時点での情報です。ご注意ください。
結局どっちのメソッドを使えばいいの?
チャット形式の UI の場合でも、そうでない場合でも今後は ChatCompletionService.GetChatMessageContentAsync メソッドを使う実装を中心にしたいところです。そうすれば、UI に引きずられた実装にはならないからです。 しかし、この ChatCompletionService.GetChatMessageContentAsync メソッドには上の警告でも記載した通り弱点があります。(詳しくはこのすぐ下の動的プロンプトの生成にてご紹介します)
そのため、2024年7月現在では基本的に次のような実装方針となるでしょう。
- チャット形式の場合は ChatCompletionService.GetChatMessageContentAsync
- コンテキストを考慮しない場合は Kernel.InvokePromptAsync(Javaの場合は Kernel.InvokeAsync)
テンプレートエンジンによる動的プロンプトの生成
チャット形式を採用しない AI アプリケーションの例として、プロンプトには固定文字列を渡していました。ですが、コンテキストを考慮しないアプリケーションの場合は、Plugin を呼び出してその結果をプロンプトに埋め込む、といった動的にプロンプト生成するパターンがとても多くなります。
例えば DB から取得した値や社内の別システムから取得したデータを使って動的にプロンプトを構築することを想像するとわかりやすいでしょう。そのような場合のために、テンプレートエンジンを使ってプロンプトを作成することができる機能を Semantic Kernel は備えています。
ご存知の通り、テンプレートエンジンは別に新しい概念ではありません。ちょっとピンとこない方は ASP.NET MVC (Core)の Razor や、 Java の Thymeleaf を思い出してください。通常の html ドキュメントに変数名やコードを埋め込んでおくと、実行時にテンプレートエンジンはそのファイルと渡された変数に応じて埋め込んだ箇所が変数値に置き換わる、あるいは埋め込んだコードが実行されて処理した結果が html ドキュメントに反映されます。テンプレートエンジンの呼び出しは View 構築時にフレームワークが自動的にやってくれます。
Semantic Kernel のテンプレートエンジンによる動的プロンプトの生成も考え方は同じです。Razor や Thymeleaf ほどの柔軟性はありませんが、既定で用意されているテンプレートエンジンである BasicPromptTemplateEngine には次の2つの機能があります。
- 変数を埋め込んでおいて、置き換える
- Plugin を呼び出す
とても複雑なプロンプトを動的に生成したい場合にはテンプレートエンジンにHandleBarsを使用することもできます。
テンプレートに変数を埋め込む
まずはテンプレートに変数を宣言して、値をセットしてみましょう。これだけだとわざわざテンプレートエンジンを使う意味はありませんが、まずはここからスタートです。
C#
using Microsoft.SemanticKernel;

var builder = Kernel.CreateBuilder()
    .AddAzureOpenAIChatCompletion(
        deploymentName: "YOUR_MODELID",
        endpoint: "YOUR_ENDPOINT",
        apiKey: "YOUR_APIKEY"
        );

Kernel kernel = builder.Build();

// テンプレート
string template = """
    {{ $today }} は何曜日ですか?
    """;

// テンプレートエンジンに渡す変数を作成
KernelArguments arguments = new KernelArguments
{
    ["today"] = DateTime.Now.ToString("yyyy-MM-dd")
};

// 変数を渡してテンプレートを作成&実行
FunctionResult result = await kernel.InvokePromptAsync(
    promptTemplate: template,
    arguments: arguments);

Console.WriteLine(result.GetValue<string>());
テンプレートの中に {{ }} で囲んだところが変数を埋め込めるところです。変数名には $ をつけます。{{ }} の中では前後のスペースは無視されますので、この例のように見やすくするために変数の前後に半角スペースを入れても良いでしょう。
テンプレートで使いたい変数は KernelArguments オブジェクトとして kernel に渡す必要があります。
ちなみに KernelArguments の初期化が見慣れない実装だと思った方がいらっしゃるかもしれません。これはインデクサーを使う Dictionary の初期化方法です。
つまり、KernelArguments は複数の変数を格納することができます。
Java
package com.microsoft;

import java.time.format.DateTimeFormatter;

import com.azure.ai.openai.OpenAIAsyncClient;
import com.azure.ai.openai.OpenAIClientBuilder;
import com.azure.core.credential.AzureKeyCredential;
import com.microsoft.semantickernel.Kernel;
import com.microsoft.semantickernel.orchestration.FunctionResult;
import com.microsoft.semantickernel.semanticfunctions.KernelFunction;
import com.microsoft.semantickernel.semanticfunctions.KernelFunctionArguments;
import com.microsoft.semantickernel.services.chatcompletion.ChatCompletionService;

public class Main {
    public static void main(String[] args) {

        final OpenAIAsyncClient client = new OpenAIClientBuilder()
                .endpoint("YOUR_ENDPOINT")
                .credential(new AzureKeyCredential("YOUR_APIKEY"))
                .buildAsyncClient();

        ChatCompletionService chatCompletionService = ChatCompletionService.builder()
                .withModelId("YOUR_MODELID")
                .withOpenAIAsyncClient(client)
                .build();

        Kernel kernel = Kernel.builder()
                .withAIService(ChatCompletionService.class, chatCompletionService)
                .build();

        String template = """
                {{ $today }} は何曜日ですか?
                """;

        // テンプレートから KernelFunction を作成する
        var kindOfDay = KernelFunction.createFromPrompt(template)
                .build();

        // テンプレートに渡す変数を KernelFunctionArgument オブジェクトにする
        var arguments = KernelFunctionArguments.builder()
                .withVariable("today",
                        java.time.LocalDateTime.now().format(DateTimeFormatter.ofPattern("yyyy/MM/dd HH:mm:ss")))
                .build();

        // 実行
        FunctionResult<Object> result = kernel
                .invokeAsync(kindOfDay)
                .withArguments(arguments).block();

        System.out.println(result.getResult());
    }
}
Java では、プロンプトを一度 KernelFunction オブジェクトに変換する、プロンプトに埋め込む変数を KenerlFunctionArguments オブジェクトにする、という2段階の工程が必要です。C# でも本来このように実装していました。いずれは Java の SDK でも C# のような便利なメソッドが用意されると思いますが、今は面倒ですが1つずつオブジェクトを作成しましょう。
テンプレートの中に {{ }} で囲んだところが変数を埋め込めるところです。変数名には $ をつけます。前後のスペースは無視されますので、コード例のように見やすくするために変数の前後に半角スペースを入れても良いでしょう。
変数を埋め込んだテンプレートによる動的プロンプトの生成は、Kernel.Invoke〜メソッドを使っており、ChatCompletionService.GetChatMessageContentAsync メソッドを使ってません。これは、ChatCompletionService.GetChatMessageContentAsync メソッドが KernelArguments オブジェクトを受け取るオーバーロードを実装していないのが理由です。
2024年7月現在、ChatCompletionService.GetChatMessageContentAsync メソッドがサポートしていない機能の1つなので注意してください。
テンプレートに Plugin を呼び出した結果を埋め込む
では、次にテンプレートの中で Plugin を呼び出して結果を埋め込んでみます。
C#
Plugin として、組み込みの Plugin として提供されている TimePlugin を使用します。事前に Microsoft.SemanticKernel.Plugins.Core のインストールが必要です。
Microsoft.SemanticKernel.Plugins.Core
using Microsoft.SemanticKernel;
using Microsoft.SemanticKernel.Plugins.Core;

var builder = Kernel.CreateBuilder()
    .AddAzureOpenAIChatCompletion(
        deploymentName: "YOUR_MODELID",
        endpoint: "YOUR_ENDPOINT",
        apiKey: "YOUR_APIKEY"
        );

Kernel kernel = builder.Build();

#pragma warning disable SKEXP0050
kernel.ImportPluginFromType<TimePlugin>("time");
#pragma warning restore SKEXP0050

string template = """
    {{ time.DaysAgo '3650' }}に日本であった大きな出来事はなんですか?
    """;

FunctionResult result = await kernel.InvokePromptAsync(
    template
    );

Console.WriteLine(result.GetValue<string>());
kernel.ImportPluginFromType<TimePlugin>("time"); で time という名前で TimePlugin を事前に読み込んでいます。そしてテンプレートの中の {{ }} で囲われたところに Plugin 呼び出しを実装しています。見ての通り、plugin名.KernelFunction 名で呼び出します。 この例では TimePlugin に実装された DaysAgo という KernelFunction を呼び出しています。DaysAgo は今日より引数に指定された日数だけ過去の日付を返却します。この場合は3650日前の日付を文字列で返してくれます。
ご覧のように、引数に固定の値を指定する場合はシングルクォーテーションで値を囲います。もちろん引数には変数を指定することができますので、その場合は $を変数名の前につけます。
ちなみに DaysAgo メソッドの仮引数名は input なので、次のようにあえて引数名を指定することもできます。
string template = """
    {{ time.DaysAgo input='3650'}}に日本であった大きな出来事はなんですか?
    """;
もう1つやっておきましょう。今度は引数が2つの場合です。
using Microsoft.SemanticKernel;
using Microsoft.SemanticKernel.Plugins.Core;

var builder = Kernel.CreateBuilder()
    .AddAzureOpenAIChatCompletion(
        deploymentName: "YOUR_MODELID",
        endpoint: "YOUR_ENDPOINT",
        apiKey: "YOUR_APIKEY"
        );

Kernel kernel = builder.Build();

#pragma warning disable SKEXP0050
kernel.ImportPluginFromType<TextPlugin>("text");
#pragma warning restore SKEXP0050

string template = """
    主人公の名前が{{ text.Concat 'Harry' input2='Potter'}}の小説の作者は?
    """;

FunctionResult result = await kernel.InvokePromptAsync(
    template
    );

Console.WriteLine(result.GetValue<string>());
今度は組もう1つの組み込み Plugin である TextPlugin を使ってみました。Concat という KernelFunction を使用して、2つの文字列を連結します。では実行してみましょう。
Concat の実装は次の通りなので、仮引数名 input, input2 に値をセットする必要があるわけです。
    [KernelFunction, Description("Concat two strings into one.")]
    public string Concat(
        [Description("First input to concatenate with")] string input,
        [Description("Second input to concatenate with")] string input2) =>
        string.Concat(input, input2);
テンプレートの中では
string template = """
    主人公の名前が{{ text.Concat 'Harry' input2='Potter'}}の小説の作者は?
    """;
となっています。このように2つ目以降の引数名の(この例では input2)は必ず指定する必要があるので注意しましょう。もちろん、次のように第1引数も引数名を指定しても構いません。指定した方がわかりやすいですね。
string template = """
    主人公の名前が{{ text.Concat input='Harry' input2='Potter'}}の小説の作者は?
    """;
Java
事前に作成済みの DateTimePlugin に新しく KernelFunction を追加します。今日の日付から指定された日数分過去の日付を返します。別に難しいことはしていません。
package com.microsoft.Plugins;

import java.time.LocalDateTime;
import java.time.format.FormatStyle;
import java.time.format.DateTimeFormatter;

import com.microsoft.semantickernel.semanticfunctions.annotations.DefineKernelFunction;
import com.microsoft.semantickernel.semanticfunctions.annotations.KernelFunctionParameter;

public class DateTimePlugin {

  @DefineKernelFunction(name = "get_current_date", description = "Gets current date and time", returnDescription = "Return current date and time with formatting conventions of the current culture")
  public static String getCurrentDateTimeString() {
    return java.time.LocalDateTime.now().format(DateTimeFormatter.ofPattern("yyyy/MM/dd HH:mm:ss"));
  }

  // 追加
  @DefineKernelFunction(name = "get_past_date_from_today", description = "The number of days to offset from today")
  public String daysAgo(
      @KernelFunctionParameter(name = "input") String input) {
    Long days = Long.parseLong(input);
    LocalDateTime dateTime = LocalDateTime.now().minusDays(days);
    return dateTime.format(DateTimeFormatter.ofLocalizedDate(FormatStyle.FULL));
  }
}
では新しく追加した KernelFunction をテンプレートの中で使ってみましょう。
package com.microsoft;

import com.azure.ai.openai.OpenAIAsyncClient;
import com.azure.ai.openai.OpenAIClientBuilder;
import com.azure.core.credential.AzureKeyCredential;
import com.microsoft.Plugins.DateTimePlugin;
import com.microsoft.semantickernel.Kernel;
import com.microsoft.semantickernel.orchestration.FunctionResult;
import com.microsoft.semantickernel.semanticfunctions.KernelFunction;
import com.microsoft.semantickernel.plugin.KernelPluginFactory;
import com.microsoft.semantickernel.services.chatcompletion.ChatCompletionService;

public class Main {
    public static void main(String[] args) {

        final OpenAIAsyncClient client = new OpenAIClientBuilder()
                .endpoint("YOUR_ENDPOINT")
                .credential(new AzureKeyCredential("YOUR_APIKEY"))
                .buildAsyncClient();

        ChatCompletionService chatCompletionService = ChatCompletionService.builder()
                .withModelId("YOUR_MODELID")
                .withOpenAIAsyncClient(client)
                .build();

        var dateTimeplugin = KernelPluginFactory.createFromObject(new DateTimePlugin(), "time");

        Kernel kernel = Kernel.builder()
                .withPlugin(dateTimeplugin)
                .withAIService(ChatCompletionService.class, chatCompletionService)
                .build();

        String template = """
                {{ time.get_past_date_from_today '3650' }} に日本であった大きな出来事はなんですか?
                """;

        var kindOfDay = KernelFunction.createFromPrompt(template)
                .build();

        FunctionResult<Object> result = kernel
                .invokeAsync(kindOfDay)
                .block();

        System.out.println(result.getResult());
    }
}
var dateTimeplugin = KernelPluginFactory.createFromObject(new DateTimePlugin(), "time"); で time という名前で DateTimePlugin を事前に読み込んでいます。そしてテンプレートの中の {{ }} で囲われたところに Plugin 呼び出しを実装しています。見ての通り、plugin名.KernelFunction 名で呼び出します。 この例では DateTimePlugin に実装された get_past_date_from_today という KernelFunction をテンプレートの中で呼び出しています。メソッド名ではなく、 KernelFunction 名を指定することに注意してください。
ご覧のように、引数に固定の値を指定する場合はシングルクォーテーションで値を囲います。もちろん引数には変数を指定することができますので、その場合は $を変数名の前につけます。
ちなみに get_past_date_from_today メソッドの仮引数名は input なので、次のようにあえて引数名を指定することもできます。
String template = """
        {{ time.get_past_date_from_today input='3650' }} に日本であった大きな出来事はなんですか?
        """;
もう1つやっておきましょう。今度は引数が2つの場合です。TextPluginを新規に作成します。
package com.microsoft.Plugins;

import com.microsoft.semantickernel.semanticfunctions.annotations.DefineKernelFunction;
import com.microsoft.semantickernel.semanticfunctions.annotations.KernelFunctionParameter;

public class TextPlugin {
  @DefineKernelFunction(description = "Concat two strings into one.", name = "Concat")
  public String concat(
      @KernelFunctionParameter(description = "First input to concatenate with", name = "input") String input,
      @KernelFunctionParameter(description = "Second input to concatenate with", name = "input2") String input2) {
    return (input + input2);
  }
}
TextPlugin の中に実装した Concat という KernelFunction を使うテンプレートを実装してみましょう。
package com.microsoft;

import com.azure.ai.openai.OpenAIAsyncClient;
import com.azure.ai.openai.OpenAIClientBuilder;
import com.azure.core.credential.AzureKeyCredential;
import com.microsoft.Plugins.TextPlugin;
import com.microsoft.semantickernel.Kernel;
import com.microsoft.semantickernel.orchestration.FunctionResult;
import com.microsoft.semantickernel.semanticfunctions.KernelFunction;
import com.microsoft.semantickernel.plugin.KernelPluginFactory;
import com.microsoft.semantickernel.services.chatcompletion.ChatCompletionService;

public class Main {
    public static void main(String[] args) {

        final OpenAIAsyncClient client = new OpenAIClientBuilder()
                .endpoint("YOUR_ENDPOINT")
                .credential(new AzureKeyCredential("YOUR_APIKEY"))
                .buildAsyncClient();

        ChatCompletionService chatCompletionService = ChatCompletionService.builder()
                .withModelId("YOUR_MODEL_ID")
                .withOpenAIAsyncClient(client)
                .build();

        var textPlugin = KernelPluginFactory.createFromObject(new TextPlugin(), "text");
        Kernel kernel = Kernel.builder()
                .withPlugin(textPlugin)
                .withAIService(ChatCompletionService.class, chatCompletionService)
                .build();

        String template = """
                主人公の名前が{{ text.Concat 'Harry' input2='Potter'}}の小説の作者は?
                """;

        var kindOfDay = KernelFunction.createFromPrompt(template)
                .build();

        FunctionResult<Object> result = kernel
                .invokeAsync(kindOfDay)
                .block();
        System.out.println(result.getResult());
    }
}
Concat の実装は次の通りなので、仮引数名 input, input2 に値をセットする必要があるわけです。
  public String concat(
      @KernelFunctionParameter(description = "First input to concatenate with", name = "input") String input,
      @KernelFunctionParameter(description = "Second input to concatenate with", name = "input2") String input2) {
    return (input + input2);
  }
テンプレートの中では
String template = """
        主人公の名前が{{ text.Concat 'Harry' input2='Potter'}}の小説の作者は?
        """;
となっています。このように2つ目以降の引数名の(この例では input2)は必ず指定する必要があるので注意しましょう。もちろん、次のように第1引数も引数名を指定しても構いません。指定した方がわかりやすいですね。
String template = """
        主人公の名前が{{ text.Concat input='Harry' input2='Potter'}}の小説の作者は?
        """;
動的プロンプトを生成しつつ、Plugin も自動的に呼び出す
ここまで動的にテンプレートを使うときは ChatCompletionService.GetChatMessageContentAsync メソッドじゃなくて Kernel.InvokePromptAsync(Java の場合は Kernel.invokeAsync) メソッドを使う方法をご紹介してきました。
既にコンテキストを考慮しない場合でも Plugin が自動的に呼ばれるようにするに記載した通り、UI を気にしない実装で統一するなら ChatCompletionService.GetChatMessageContentAsync メソッドを使いたいところですが、その場合は変数の置き換えができない制限があります。そのため動的プロンプトを生成する本番の実装では Kernel.InvokePromptAsync(Java の場合は Kernel.invokeAsync) メソッドを使うのが既定となるでしょう。
ChatCompletionService.GetChatMessageContentAsync メソッドを使うこともできなくはありません。 ChatCompletionService.GetChatMessageContentAsync メソッド の第一引数に渡していた固定文字列のプロンプト中で {{ }} を使って Plugin 呼び出しを書くだけです。
using Microsoft.SemanticKernel;
using Microsoft.SemanticKernel.Plugins.Core;

var builder = Kernel.CreateBuilder()
    .AddAzureOpenAIChatCompletion(
        deploymentName: "YOUR_MODELID",
        endpoint: "YOUR_ENDPOINT",
        apiKey: "YOUR_APIKEY"
        );

Kernel kernel = builder.Build();

#pragma warning disable SKEXP0050
kernel.ImportPluginFromType<TimePlugin>("time");

var chatCompletionService = kernel.GetRequiredService<IChatCompletionService>();

//#pragma warning disable SKEXP0010
OpenAIPromptExecutionSettings openAIPromptExecutionSettings = new()
{
    ToolCallBehavior = ToolCallBehavior.AutoInvokeKernelFunctions
};

var result = await chatCompletionService.GetChatMessageContentAsync(
    "{{ time.DaysAgo '3650' }}に日本であった大きな出来事はなんですか?",
    executionSettings: openAIPromptExecutionSettings,
    kernel: kernel);

Console.WriteLine(result.ToString());
package com.microsoft;

import com.azure.ai.openai.OpenAIAsyncClient;
import com.azure.ai.openai.OpenAIClientBuilder;
import com.azure.core.credential.AzureKeyCredential;
import com.microsoft.Plugins.DateTimePlugin;
import com.microsoft.semantickernel.Kernel;
import com.microsoft.semantickernel.orchestration.InvocationContext;
import com.microsoft.semantickernel.orchestration.ToolCallBehavior;
import com.microsoft.semantickernel.plugin.KernelPluginFactory;
import com.microsoft.semantickernel.services.chatcompletion.ChatCompletionService;

public class MainForBlog {
  public static void main(String[] args) {

    final OpenAIAsyncClient client = new OpenAIClientBuilder()
        .endpoint("YOUR_ENDPOINT")
        .credential(new AzureKeyCredential("YOUR_APIKEY"))
        .buildAsyncClient();

    ChatCompletionService chatCompletionService = ChatCompletionService.builder()
        .withModelId("YOUR_MODEL_ID")
        .withOpenAIAsyncClient(client)
        .build();

    var dateTimeplugin = KernelPluginFactory.createFromObject(new DateTimePlugin(), "time");

    Kernel kernel = Kernel.builder()
        .withPlugin(dateTimeplugin)
        .withAIService(ChatCompletionService.class, chatCompletionService)
        .build();

    var invocationContext = InvocationContext.builder()
        .withToolCallBehavior(ToolCallBehavior.allowAllKernelFunctions(true))
        .build();

    var reply = chatCompletionService.getChatMessageContentsAsync(
        "{{ time.get_past_date_from_today '3650' }} に日本であった大きな出来事はなんですか?",
        kernel,
        invocationContext)
        .block();

    System.out.println(reply.get(reply.size() - 1).getContent());
  }
}
ただし、既に記載した通り、変数を埋め込んだ動的プロンプトの生成は KernelArguments を受け取れないため ChatCompletionService.GetChatMessageContentsAsync メソッドがサポートしていません。
そのため、動的プロンプトを使用する場合、変数埋め込みと Plugin 呼び出しの両方同時に行うのであれば Kernel.InvokePromptAsync(Java の場合は Kernel.invokeAsync) メソッドを使用することになります。詳しくはコンテキストを考慮しない場合でも Plugin が自動的に呼ばれるようにするをご確認ください。
テンプレートから生成したプロンプトを確認したい
テンプレートから生成したプロンプトを確認したい、あるいは生成した結果が予定とは大きく異なるものの場合は処理を中断する、などの動的に作成したプロンプトについての処理を行いたい場合があるでしょう。
そのような場合に Filter(Java では Hooks)を実装します。とても重要な機能で Semantic Kernel ならではの機能でもあります。
詳しい解説はこの下のSemantic Kernel の挙動を監視するをご確認ください。
新しい概念【3つの P】
AI モデルの呼び出しも、Plugin としてネイティブコードを使うのも、動的にテンプレートを作成するのも、どれもとても簡単だったと思います。なんとなく Semantic Kernel はどう使うのか、感覚は掴めたと思います。ではここから概念レベルにおける Semantic Kernel の説明をして行きます。
これまでの Semantic Kernel では 次の2つが次の図とともに主要機能として紹介されていました。
- Planner
- Plugin(以前は Skillと呼ばれていました)
Kernel に対して Planner と Skill(Plugin) をセットアップし、実行すると Planner によって実行計画が作成されてその実行計画の通りに AI モデルと Skill(Plugin) が呼び出される、という考え方です。初めて聞くと、わかるような気がしますが、具体性がなくてちょっとわからないですね。
ちなみにこの図の S, M, C ですが、
- S は Skill(Plugin)
- M は Memory
- C はConnector
です。Skill(Plugin)は既に上で使用していますので、説明は不要でしょう。Memory の主な機能は
- 文字列を Key-Valueペアの形式で保存してKeyで検索可能
- 文字列をローカルストレージに保存し、ファイル名で検索可能
- 文字列を embedding して保存し、Semantic検索が可能
でした。Connector とは外部リソースとの連携をするためのものです。Memory と Connector は要件に応じて使用するもので、現在の Semantic Kernel にも少しだけ変更されつつも残っています。
話を戻して、これまでの Semantic Kernel の主要概念であった
- Planner
- Plugin(以前は Skillと呼ばれていました)
ですが、2024年7月現在、この2つを主要機能とする考え方はもう存在しません。 代わりの次の新しい3つの概念が登場しています。
- Plugin
- Plan(計画)
- Persona(人格)
最初にお伝えしておきたいのが、この3つのP、うまくまとまっているようですが実はあまり意味はありません。数が3つでかつ頭文字をPに揃えたら、なんとなくそれっぽくて良い感じ?と言うものでしかないのです。この3つの P の詳細はこの後解説しますが、Plan と Persona はかなり無理矢理な感じです。もちろん、知っておく必要はありますが正直大した話ではありませんので、身構えないでください。
Kernel とは
3つの P の前に Semantic Kernel 発表時から変わらずに概念と実装の中心である Kernel について先にご紹介しておきます。Semantic Kernel は、Kernel モデルに基づいています。
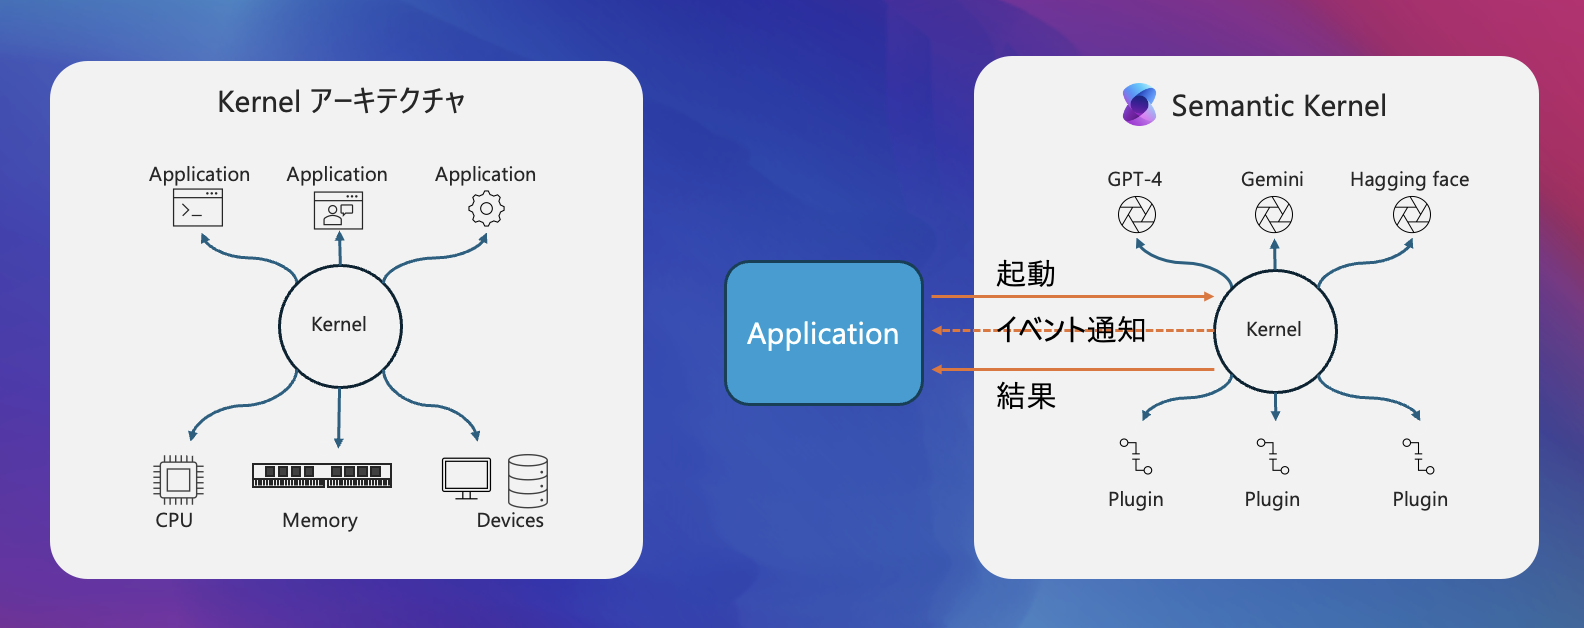
みなさんご存知の通り OSのコア機能である Kernel がCPU、メモリやデバイスとアプリケーションとの間に立って、上手いことやってくれるように、Sementic Kernel は AI モデルと Plugin の間に立ってうまくやってくれるアーキテクチャを実現しています。
Web を検索する、DB を検索する、WebAPIを叩いてデータを取得する、などの単体の処理を行う Plugin を定義して、それを Semantic Kernel の Kernel オブジェクトに登録しておきます。Kernel に Plugin は複数登録できます。アプリケーションから Kernel オブジェクトに対してプロンプトを投げると、あとは Kernel オブジェクトが AI モデルとの間に立って上手いこと AI モデルを使って必要な Plugin だけ必要な回数実行して結果を生成してくれるのです。もう少し具体的に言うと、
- プロンプトと Plugin の情報から実行計画を AI モデルに作成させる
- 実行計画の通りに Plugin を実行(複数回実行の可能性あり)
- AI モデルを使って最終的な結果を生成
この一連の処理を Kernel オブジェクトが全て自動的にやってくれるのです。
Plugin とは
上の最もシンプルな Plugin を作ってみようをご確認いただくとわかる通り、ネイティブコードで用意したメソッドに対して、属性(Java は Annotation)を付与して kernel に読み込ませるだけで、Semantic Kernel は そのメソッドを Plugin として認識します。Plugin として Semantic Kernel に認識させる方法は他にもありますが、基本的に最もシンプルな Plugin を作ってみようでご紹介した方法を使うことになるでしょう。
属性/Annotationを付与する以外の方法で Plugin を Semantic Kernel に登録する方法のうち、是非採用を検討していただきたいのは OpenAPI 仕様(OpenAIではありません!)を公開している WebAPI です。Semantic Kernel は公開された OpenAPI 仕様にアクセスして Plugin として取り込みます。
2024年7月現在では残念ながら C# と Python の SDK のみの実装ですが、いずれ Java 版でもリリースされると思います。
Plugin を作る勘所
Database、ファイルサーバーへアクセスしてデータを取得する、という処理をメソッドで書けば、すぐに Plugin として使用できるわけですから、エンタープライズアプリケーションがとても実装しやすいことがお分かりいただけるかと思います。
この Plugin の仕組みは、特に既存の他システムとの連携をする場合に高い効果を発揮しやすいです。他システムが自作システムでない場合、最近の大抵のシステムは WebAPI を備えています。Plugin を作る場合、まずその WebAPI を使ってデータを取得する Plugin を作るところから始めることを考えてみてください。短時間で効果の高い AI を使ったシステムを構築できるでしょう。
組み込み or ソース公開中の Plugin
Plugin で汎用的に使えそうなものは SDK で用意されている、またはソースが公開されているものがいくつかあります。それほど数があるわけではないのですが、ゼロから作らなくて良いのは助かります。
C#
Microsoft.SemanticKernel.Plugins.Core に同梱されている Plugin
- ConversationSummaryPlugin
- FileIOPlugin
- HttpPlugin
- MathPlugin
- TextPlugin
- TimePlugin
- WaitPlugin
メソッドと引数を見ればすぐ使い方はわかるぐらいシンプルなものばかりですが、挙動を確認する場合はソースコードをご参照ください。
https://github.com/microsoft/semantic-kernel/tree/main/dotnet/src/Plugins/Plugins.Core
ではいくつかの Plugin を実際に使ってみましょう。
TimePlugin
using Microsoft.SemanticKernel.Plugins.Core;
・・・
Kernel kernel = builder.Build();
・・・
#pragma warning disable SKEXP0050
kernel.Plugins.AddFromType<TimePlugin>();
HttpPlugin
using Microsoft.SemanticKernel.Plugins.Core;
・・・
Kernel kernel = builder.Build();
・・・
#pragma warning disable SKEXP0050
kernel.Plugins.AddFromType<HttpPlugin>();
Microsoft.SemanticKernel.Plugins.Web に同梱されている Plugin
実装サンプルが少しだけ用意されています。
SearchUrlPlugin
BingAndGooglePlugin
よく使うであろう Bing 検索用の Plugin を使ってみましょう。あらかじめ、Bing 検索用の API キーを取得しておく必要があります。(Azure の契約が必要です)
WebsearchEnginePlugin+BingConnector
using Microsoft.SemanticKernel.Plugins.Web;
using Microsoft.SemanticKernel.Plugins.Web.Bing;
・・・
Kernel kernel = builder.Build();
・・・
#pragma warning disable SKEXP0050
var bingConnector = new BingConnector("YOUR_APIKEY");
var bing = new WebSearchEnginePlugin(bingConnector);
kernel.ImportPluginFromObject(bing, "bing");
この実装、よく見ると Plugin の登録時に Type を指定するのではなく、オブジェクトを渡しています。渡されたオブジェクトのメソッドには属性/Annotaionが付与されています。これはもし、Plugin に事前に値をセットしてから Kernel に登録したい場合はこのようにオブジェクトを渡して Plugin 登録することができることを示しています。
Java
Java には残念ながら組み込みの Plugin が提供されていません。いずれ SDK に組み込まれるとは思われますが、現時点ではサンプル実装という形で提供されています。
ConversationSummaryPlugin
MathPlugin
TextPlugin
TimePlugin
SearchUrlPlugin
WebSearchEnginePlugin
実装サンプル
Example13_ConversationSummaryPlugin
Example07_BingAndGooglePlugins
Plan とは
上の最もシンプルな Plugin を作ってみようの説明で、次のような処理が行われたことがわかる、と説明しました。
- 処理に必要な Plugin を使うことを判定
- Plugin を使用
- Plugin から得られた結果を使って最終的な文章を生成
このうちの1番目、「処理に必要な Plugin を使うことを判定」をしている箇所は、LLM の Function Calling を使用しています。
Function Callinig は、与えられたプロンプトと Plugin の情報から、どの Plugin を何回呼び出すのか、という実行計画を返却します。
Semantic Kernel の新しい概念のうちの1つである Plan とは、この Function Calling によって得られる実行計画のことです。そして Semantic Kernel は今後 Function Calling による実行計画の取得のみをサポートするようになり、既存のやり方である Planner を使った計画の作成は非推奨となりました。つまり、大仰に Plan と言う概念を掲げていますが、上に書いた 最もシンプルな Plugin を作ってみよう をご確認いただくと分かる通り、実行計画を作成するために特別な実装は不要なのです。
Function Calling は OpenAI から始まり、今では Gemini、Claude、Mistralなどでも使用可能なほど、ほとんどの AI モデルの共通の機能となりました。そのため、Semantic Kernel は Open AI の GPT 以外の AI モデルを使用する場合であっても大抵の場合は問題なく動作しますが、使用したい AI モデルが Function Calling をサポートしているかは事前に確認してください。
Persona とは
LLM では ChatCompletion が基本的に使用されます。チャットでは主に次の3種類のメッセージがあることはみなさんご存知でしょう。
- システムメッセージ
- ユーザーメッセージ
- アシスタントメッセージ
(もう1つツールメッセージというのもあります)
システムメッセージで最初に役割を与えます。チャットが始まったらユーザーの入力がユーザーメッセージで、LLM によって生成されたメッセージがアシスタントメッセージです。
ペルソナとは要するにシステムメッセージにセットアップする役割=キャラ付けのことです。つまりペルソナは Semantic Kernel の概念ではなく、Chat Completion を使うときのテクニックの1つです。Chat Completion においてシステムメッセージの使用は必須ではありませんが、より高い精度で処理を行うためにはこのシステムメッセージに細かく情報をセットした方が良い、というベストプラクティスを提案しているにすぎません。つまりペルソナの設定は必須ではありません。あくまでセットアップした方が良い結果になりやすい、というものです。
MS Learn にはペルソナとしてシステムメッセージにどんなことを設定すると良いのか、記載があります。
セットした方が良い精度になるなら、積極的に使いましょう。システムメッセージとしてどんなことを設定すると良いのか、とても良くまとまっていますので、是非ご一読ください。
システムメッセージの設定方法
チャット形式であれば、ChatHisotry オブジェクトにシステムメッセージをセットすることができます。
C#
ChatHistory history = new ChatHistory();

chatHistory.AddSystemMessage("Remember to ask for help if you're unsure how to proceed.")
Java
ChatHistory history = new ChatHistory();

history.addSystemMessage("Remember to ask for help if you're unsure how to proceed.")
ChatHistory を使用しない、つまりコンテキストを使わない場合はプロンプトにシステムメッセージを埋め込みます。
string ChatPrompt = """
            <message role="system">Respond with JSON.</message>
            <message role="user">{{ $input }}</message>
            """;
この例は $input に処理させたい値をセットする動的プロンプトです。実際には Plugin を使った複合的な内容になるでしょう。
Semantic Kernel の挙動を監視する
ここまでの説明で、Plan=実行計画の作成には Function Calling を用いることがお分かりいただけたかと思います。Function Calling はとても高い精度の実行計画を作成しますが、LLM が生成した結果ですから常に完璧ではありません。もしかしたら処理がループしてしまうような実行計画を作成することもあり得るのです。
Semantic Kernel は自動的に色んなことをやってくれますが、そのプロセスの途中で挙動を監視可能である必要があり、その挙動監視用の機能を提供しています。
Filter(Hooks)
Semantic kernel では、Plugin の実行と Prompt のレンダリング処理の途中で処理を挟み込むことができます。C# 版 SDK は Filter としてひと昔前でいうところの AOP な感じで Injection するように実装し、Java 版の SDK は Hooks としてイベントハンドラを実装します。この Filter(Hooks) 処理をしっかりと実装しておくことがエンタープライズアプリケーションでは必須ですが、MS Learn にはまだ記載がありません。GitHub のリポジトリを参照して実装方法を確認する必要があります。
Filter(Hooks) には前述の通り Plugin 実行時用と、 Prompt レンダリング時用の2種類に大別できます。ここでは Plugin の Filter(Hooks) についてのみ解説します。Plugin の Filter(Hooks) がわかれば、Prompt の Filter は同様に作ることができます。
Plugin 用の Filter を実装すると、実行時に次のような情報を手にいれることができるようになります。(Java の Hooks は一部のみ取得可能)
- Chatの履歴(今回のPromptを含む)
-
Function(Plugin) 呼び出し前
- どの Function が呼ばれるのか
- Function を呼び時の引数
- この Function を呼ぶのは何回目か
- Function Calling に使用した AI モデル名
- プロンプトのToken数、AI モデルが生成した結果のToken数、合計Token数
-
Function(Plugin) 呼び出し後
- Function から受け取る処理結果
Filter の場合は処理実行前後で StopwatchTimer を動かして、Function の処理時間を計測することも簡単に実装できます。
Filter は従来イベントに対してイベントハンドラメソッド( Hooks )を登録する形式でしたが、最新の方法は Filter クラスを自作し、それを DIContainer に登録しておけば、自動的に呼び出される方式に変わっています。
ところが Java の SDK ではまだ Hooks をと登録する形式のままなのです。これは Java が DIContainer を言語レベルでサポートしていないからだと思われます。
ではそれぞれ言語ごとに実装を見てみましょう。
C#
Filter の種類
2024年7月現在、用意されている Filter タイプは次の3種類です。
- AutoFunctionInvocation
- FunctionInvocation
- PromptRender
調べてみると他にも Filter があることに気が付かれると思いますが、それらは全て Obsolute (廃止予定)です。そしてこの 3種類の Filter ですが、2つ目の FunctionInvocation は実質的に使いません。既にご説明した通り、実行計画はFunction Calling を使って取得し、その結果をもとに自動的にメソッドは呼び出されます。そのため、1番目の AutoFunctionInvodation を使えば必要な情報は手に入ります。個別のメソッド自動呼び出しについてどうしても FunctionInvodation を使って詳細に確認をする必要がある、ということもないわけではないと思いますが、得られる情報もほぼ同じなのです。
AutoFunctionInvocation Filter を実装する
C# では前述の通り AutoFunctionInvocation Filter を作ります。実装は結構簡単です。IAutoFunctionInvocationFilter というインターフェースを実装するのですが、実装しなければならないメソッドは1つしかありません。
これが最もシンプルな、シンプル過ぎて全く意味はない Filter の実装です。
internal sealed class AutoFunctionInvocationFilter() : IAutoFunctionInvocationFilter
{
    public async Task OnAutoFunctionInvocationAsync(AutoFunctionInvocationContext context, Func<AutoFunctionInvocationContext, Task> next)
    {
        // KernelFunction 実行
        await next(context);
    }
}
await next(conext); が KernelFunctionの実行です。この前後で欲しい情報を得て、ログに出力するなり、処置を中断する(KernelFunction を呼ばない)なり、処理を実装するわけです。
この Filter を DI Container に登録します。
var builder = Kernel.CreateBuilder()
    .AddAzureOpenAIChatCompletion(
        deploymentName: "YOUR_MODEL_ID",
        endpoint: "YOUR_ENDPOINT",
        apiKey: "YOUR_APIKEY"
        );

#pragma warning disable SKEXP0001
builder.Services.AddSingleton<IAutoFunctionInvocationFilter, AutoFunctionInvocationLoggingFilter>();

・・・
これだけです。これだけで 登録した Plugin(KernelFunction) が呼び出される時に、実装した AutoFunctionInvocationFilter の OnAutoFunctionInvocationAsync メソッドが呼び出されます。プロンプトの内容から Plugin を呼び出す必要がない、と判断された場合にはメソッドは呼ばれません。
ではもっと情報を取得しましょう。取得した情報は通常ログに出力すると思いますので、まずはそのログ設定を実装します。
var builder = Kernel.CreateBuilder()
    .AddAzureOpenAIChatCompletion(
        deploymentName: "YOUR_MODELID",
        endpoint: "YOUR_ENDPOINT",
        apiKey: "YOUR_APIKEY"
        );

+ var loggerFactory = LoggerFactory.Create(builder =>
+ {
+     builder.AddConsole().SetMinimumLevel(LogLevel.Trace);
+ });

+ var logger = loggerFactory.CreateLogger<Program>();
+ builder.Services.AddSingleton<ILogger>(logger);

#pragma warning disable SKEXP0001
builder.Services.AddSingleton<IAutoFunctionInvocationFilter, AutoFunctionInvocationLoggingFilter>();

・・・
ではちょっと長いですが AutoFunctionInvocationFilter を次のように修正します。プライマリコンストラクタでILogger のオブジェクトを受け取っていることに注意してください。この実装はできるだけ情報をログに出力するようにしていますので、実際はここまでやる必要はありません。
internal sealed class AutoFunctionInvocationLoggingFilter(ILogger logger) : IAutoFunctionInvocationFilter
{
    public async Task OnAutoFunctionInvocationAsync(AutoFunctionInvocationContext context, Func<AutoFunctionInvocationContext, Task> next)
    {
        if (logger.IsEnabled(LogLevel.Trace))
        {
            logger.LogTrace("ChatHistory: {ChatHistory}", JsonSerializer.Serialize(context.ChatHistory));
        }

        if (logger.IsEnabled(LogLevel.Debug))
        {
            logger.LogDebug("Function count: {FunctionCount}", context.FunctionCount);
        }

        var functionCalls = FunctionCallContent.GetFunctionCalls(context.ChatHistory.Last()).ToList();

        if (logger.IsEnabled(LogLevel.Trace))
        {
            functionCalls.ForEach(functionCall
                => logger.LogTrace(
                    "Function call requests: {PluginName}-{FunctionName}({Arguments})",
                    functionCall.PluginName,
                    functionCall.FunctionName,
                    JsonSerializer.Serialize(functionCall.Arguments)));
        }

        logger.LogInformation("Function {FunctionName} invoking.", context.Function.Name);

        long startingTimestamp = Stopwatch.GetTimestamp();
        try
        {
            // Plugin 実行
            await next(context);

            logger.LogInformation("Function {FunctionName} succeeded.", context.Function.Name);
            logger.LogTrace("Function result: {Result}", context.Result.ToString());

            if (logger.IsEnabled(LogLevel.Information))
            {
                var usage = context.Result.Metadata?["Usage"];

                if (usage is not null)
                {
                    logger.LogInformation("Usage: {Usage}", JsonSerializer.Serialize(usage));
                }
            }
        }
        catch (Exception exception)
        {
            logger.LogError(exception, "Function failed. Error: {Message}", exception.Message);
            throw;
        }
        finally
        {
            if (logger.IsEnabled(LogLevel.Information))
            {
                TimeSpan duration = new((long)((Stopwatch.GetTimestamp() - startingTimestamp) * (10_000_000.0 / Stopwatch.Frequency)));

                // Capturing the duration in seconds as per OpenTelemetry convention for instrument units:
                // More information here: https://opentelemetry.io/docs/specs/semconv/general/metrics/#instrument-units
                logger.LogInformation("Function completed. Duration: {Duration}s", duration.TotalSeconds);
            }
        }
    }
}
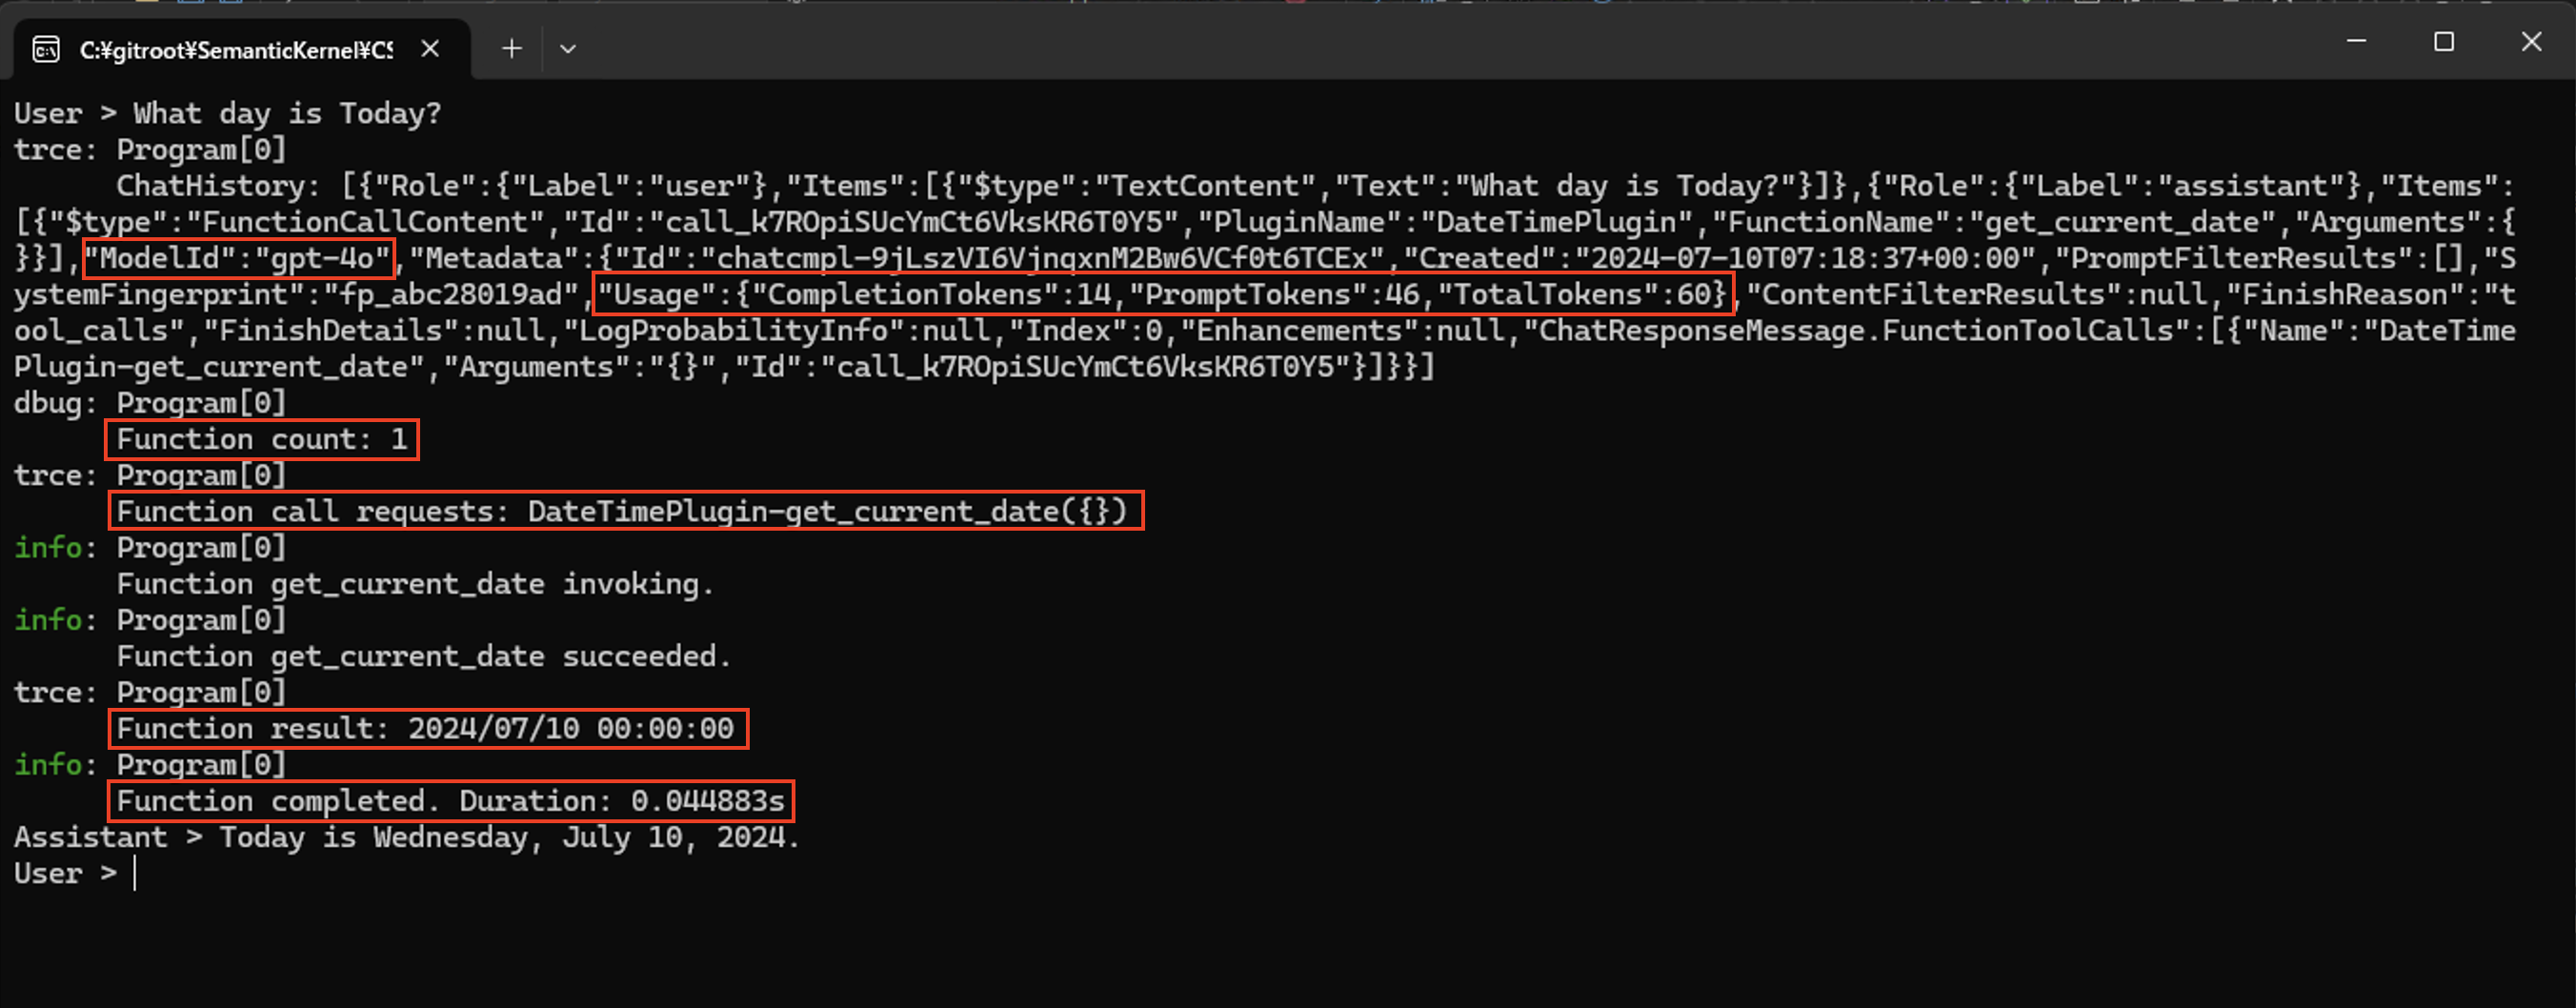
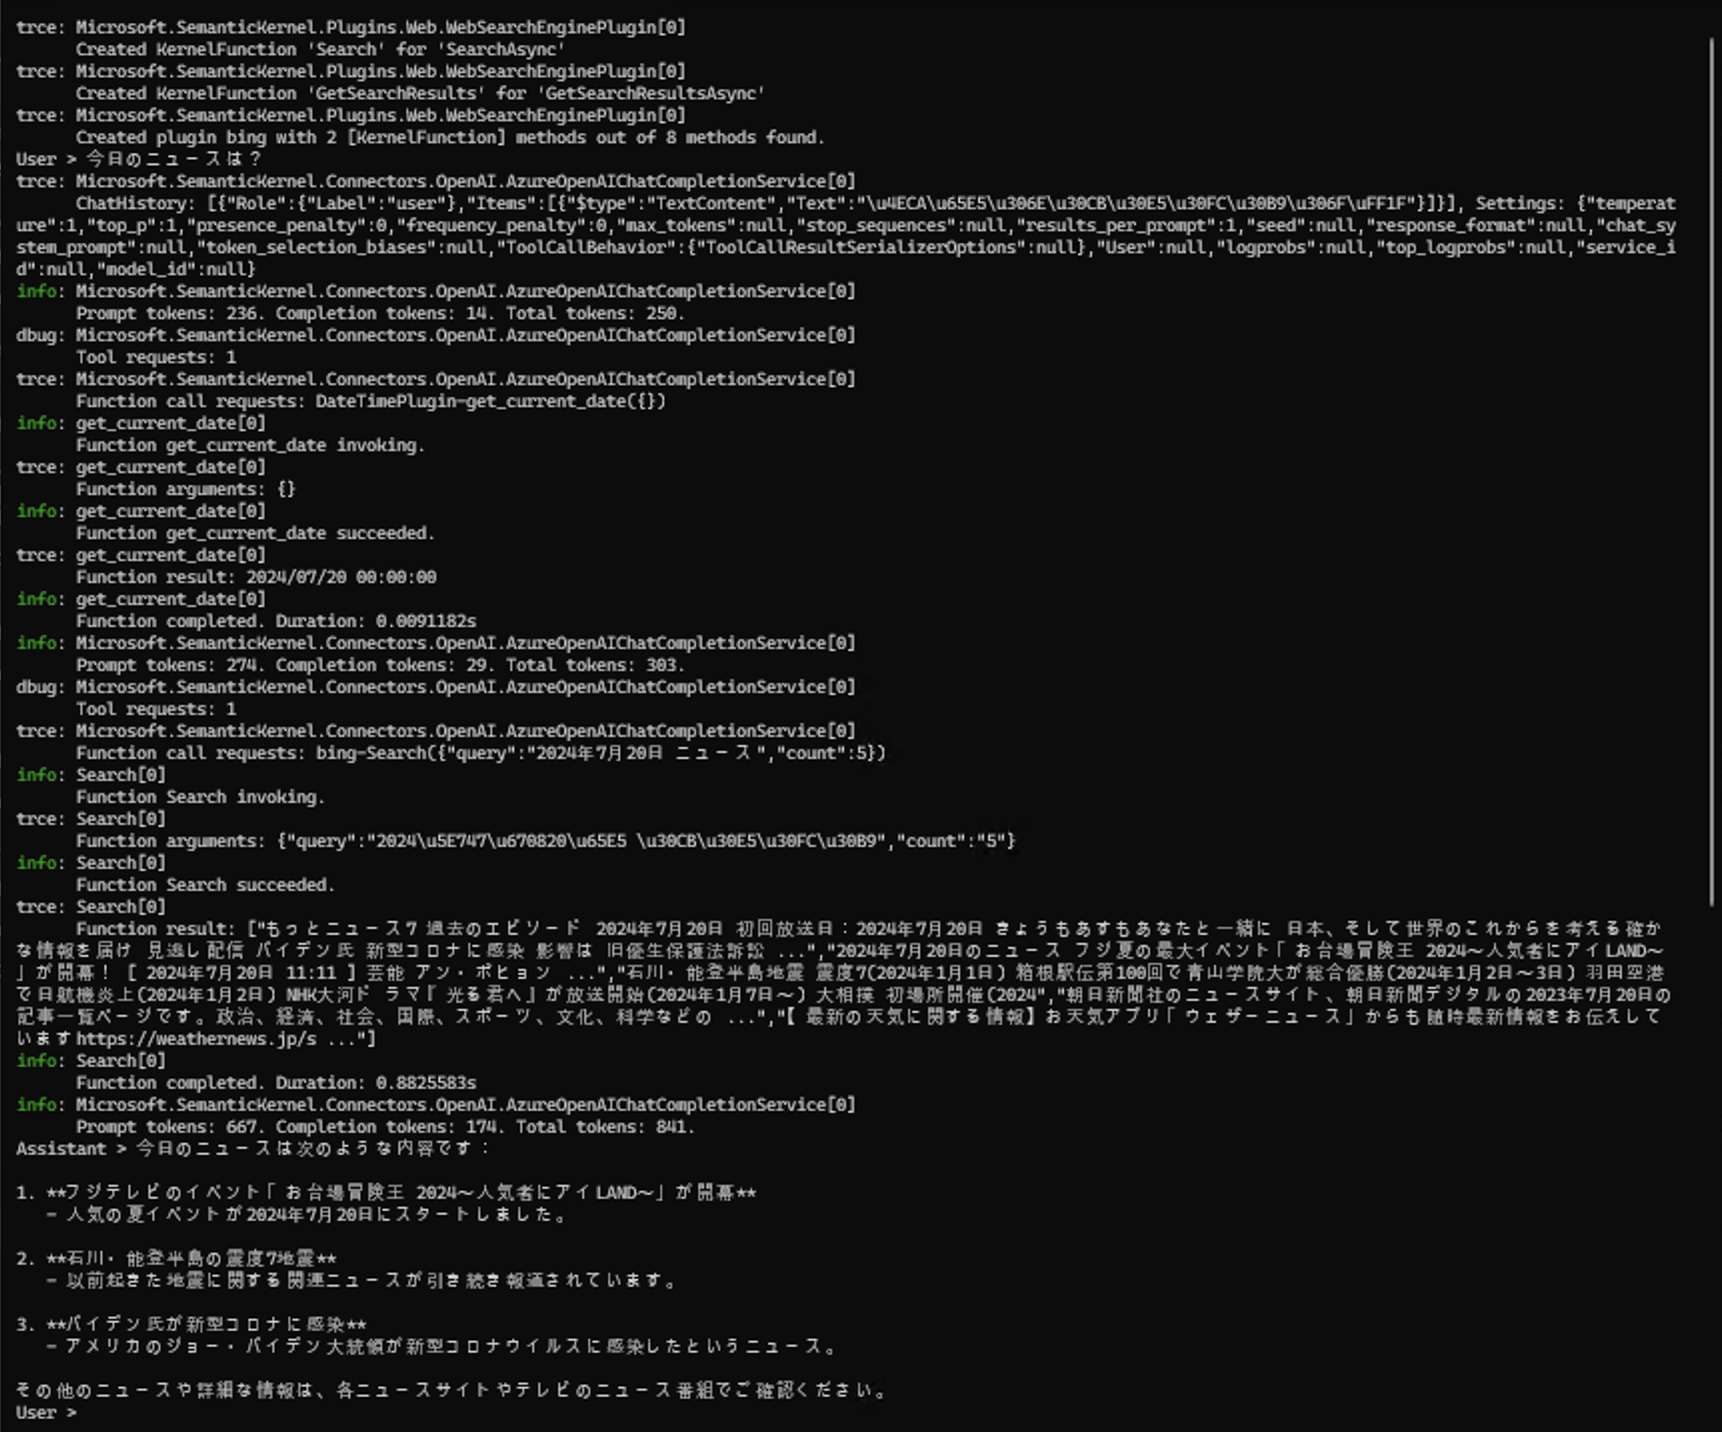
では実行してみます、Consoleにログを出力するようにしていますのですぐ結果がわかります。
ログに出力された値が読めるように英語で今日の日付を聞きましたが、もちろん日本語でチャットしても同様の結果になります。(日本語はエンコードされます)
注目したい情報を赤枠で囲っておきました。どのモデルを使ったのか、どの Function を呼び出すのか、何回目の呼び出しか、呼び出した結果、処理時間などがわかります。
PromptRender Filter を実装する
PromptRender Filter はプロンプトを動的に生成するメソッドを使用した場合にだけ呼び出される Filter です。プロンプトを動的に生成するかどうかはどのメソッドを使うか次第です。例えば
await kernel.InvokePromptAsync("Hello!") という感じで InvokePromptAsync メソッドを使用した場合、プロンプトが "Hello!" のように変数の置き換えや Plugin の実行を含んでいなくても動的にプロンプトを生成する処理を通過するので、PromptRender Filter を Call します。では実装を見てみましょう。最もシンプルで、シンプル過ぎて全く意味はない Filter の実装です。
using Microsoft.SemanticKernel;

namespace SemantcKernelConsoleAp.Filters;

#pragma warning disable SKEXP0001
internal class PromptRenderFilter : IPromptRenderFilter
{
    public async Task OnPromptRenderAsync(PromptRenderContext context, Func<PromptRenderContext, Task> next)
    {
        // プロンプトのレンダリング実行
        await next(context);
    }
}
#pragma warning restore SKEXP0001
await next(conext); がプロンプトの生成処理です。この前後で欲しい情報を得て、ログに出力するなり、プロンプトを上書きするなり、何かしらの処理を実装するわけです。AutoFunctionInvocationFilter の時と全く同じ方式で実に AOP っぽいですね。
この Filter を DI Container に登録します。
・・・
#pragma warning disable SKEXP0001
builder.Services.AddSingleton<IPromptRenderFilter, PromptRenderFilter>();
#pragma warning restore SKEXP0001

var kernel = builder.Build();
・・・
DI Container に登録する、ということはインスタンス化を DI Container に任せて オブジェクト間の依存を解決してもらうことになります。そうではなく、次のように自分でインスタンス化した Filter を kernel オブジェクトに渡すこともできます。事前に何か設定値をセットしたい場合はこちらを使うことになるでしょう。
・・・
var kernel = builder.Build();

#pragma warning disable SKEXP0001
kernel.PromptRenderFilters.Add(new PromptRenderFilter());
#pragma warning restore SKEXP0001
・・・
PromptRender Filter では 基本的にプロンプトのレンダリング(生成)結果に対して何かしらのロジックで正誤判定し、修正します。
using Microsoft.SemanticKernel;

namespace SemantcKernelConsoleAp.Filters;

#pragma warning disable SKEXP0001
internal class PromptRenderFilter : IPromptRenderFilter
{
    public async Task OnPromptRenderAsync(PromptRenderContext context, Func<PromptRenderContext, Task> next)
    {
        // プロンプトのレンダリング実行
        await next(context);

        // レンダリングしたプロンプトを表示
        Console.WriteLine($"RenderedPrompt: {context.RenderedPrompt}");

        // レンダリング結果を上書きもできる
        context.RenderedPrompt = "Hello!";
    }
}
#pragma warning restore SKEXP0001
Java
Java 版の SDK は Filter + DI による実装に舵を切っておらず、旧来の Hooks の形式での提供のままで機能追加が進んでいます。もちろん Hooks であっても情報の取得は可能ですが、現在は AutoFunctionCalling 向けの Hooks がありません。つまり、C# のように Function 呼び出し回数を取得することができませんので自分で回数をカウントしなければなりません。非同期処理として実装する場合はカウント数がおかしくならないように注意してください。
2024年7月現在、使用可能な Hooks は次の4つです。
- FunctionInvokingHook
- FunctionInvokedHook
- PromptRenderingHook
- PromptRenderdHook
FunctionInvokingHook と FunctionInvokedHook を実装する
ではまず FunctionInvokingHook と FunctionInvokedHook の2つを実装してみましょう。
    Kernel kernel = Kernel.builder()
            .build();

    kernel.getGlobalKernelHooks().addFunctionInvokingHook(event -> {
        // 何か処理する
        return event;
    });

    kernel.getGlobalKernelHooks().addFunctionInvokedHook(event -> {
        // 何か処理する
        return event;
    });
Hooks はただのイベントハンドラですので、ハンドラに渡された event オブジェクトから情報を引っ張り出して何かしらの処理を実装することになります。event オブジェクトには呼び出す(呼び出された) KernelFunction 名や引数、呼び出した結果などが格納されています。それらをざっと確認するなら次のように実装することになります。
    Kernel kernel = Kernel.builder()
            .withPlugin(dateTimeplugin)
            .build();

    kernel.getGlobalKernelHooks().addFunctionInvokingHook(event -> {
        System.out.print("Function call requests: " + event.getFunction().getPluginName() + "-"
                + event.getFunction().getName() + "[{");

        var arg = event.getArguments().values();
        if (!arg.isEmpty()) {
            var values = arg.toArray(new ContextVariable[arg.size()]);
            for (var value : values) {
                System.out.print(value.toPromptString() + ",");
            }
        }
        System.out.println("}]");

        System.out.println("Function " + event.getFunction().getName() + " invoking.");

        return event;
    });

    kernel.getGlobalKernelHooks().addFunctionInvokedHook(event -> {
        System.out.println("Function " + event.getFunction().getName() + " invoked.");
        var result = event.getResult().getResultVariable().toPromptString();
        System.out.println("Function result: " + result);

        return event;
    });
ここでは単にコンソールに出力しました。実行してみると次のようになります.
赤枠で囲んだところが Hooks が出力した情報です。どの Plugin が呼ばれようとしたのか、呼び出した結果は何か、などがわかるようになりました。
PromptRenderingHook と PromptRenderdHook を実装する
やり方は FunctionInvokingHook と FunctionInvokedHook の時と同じです。
    kernel.getGlobalKernelHooks().addFunctionInvokingHook(event -> {
      // 何か処理する
      return event;
    });

    kernel.getGlobalKernelHooks().addFunctionInvokedHook(event -> {
      // 何か処理する
      return event;
    });
PromptRenderingHook は、プロンプトを生成する前に呼ばれますが、これは実質 FunctionInvokingHook と同じ情報しか event オブジェクトから取得できません。つまり、KernelFunction と KernelAugments の情報です。プロンプトを動的生成する場合、内部的に KernelFunction に変換してから実行されるのがその理由ですが、あまり重要な情報は取得できません。
なので、主に処理は PromptRenderdHook に実装します。
    kernel.getGlobalKernelHooks().addPromptRenderedHook(event -> {
      System.out.println("Prompt Function " + event.getFunction().getName() + " invoked.");
      var result = event.getPrompt();
      System.out.println("Prompt result: " + result);

      return event;
    });
Java版の SDK で注意が必要なのは、生成されたプロンプトを上書きできない、ということです。もし生成されたプロンプトに不正な値が含まれている場合は、Exeption をスローするしかありません。
PromptRedner の Filter(Hooks)を作成する時に注意です。2024年7月現在、C# 版 SDK の IPromptRenderFilter を実装したクラスと、Java の addPromptRenderedHook メソッドで追加したイベントハンドラは ChatCompletionService.GetChatMessageContentAsync メソッドを使用した場合、呼び出されません。 上記例のように Kernel.InvokePromtAsyc メソッドを使用しなければなりません。
これもまた ChatCompletionService.GetChatMessageContentAsync メソッド使用時の注意の1つです。
おそらくこれはバグか未実装なだけなのでいずれは対応されると思いますが、現時点では ChatCompletionService.GetChatMessageContentAsync メソッドを使用した場合、動作しないので注意してください。
C#限定:ログ
C# の Semantic Kernel SDK は DIContainer に依存クラスを登録することで自動的にオブジェクトを生成して Injection してくれる仕組みを最大限に利用しています。そして Filter や組み込みの Plugin はログ出力用のオブジェクトを Injection された場合はログを自動的に出力するよう実装されています。これを利用するととても簡単にログ機能を実装できます。
Filter (+ほとんどの組み込み Plugin)のログ出力
Filter のログ出力用には ILogger オブジェクトを受け取ることを前提にした実装です。ここでは Console にログを出力してみましょう。事前にMicrosoft.Extensions.Logging.Consoleのインストールが必要です。
次のように実装します。
・・・
var builder = Kernel.CreateBuilder()
    .AddAzureOpenAIChatCompletion(
        deploymentName: "YOUR_MODEL_ID",
        endpoint: "YOUR_ENDPOINT",
        apiKey: "YOUR_APIKEY"
        );

LoggerFactory loggerFactory = new() ;

// ロガーを作成
var logger = loggerFactory.CreateLogger<Program>();
builder.Services.AddSingleton<ILogger>(logger);

// 出力するログレベルをセット
builder.Services.AddLogging(services => services.AddConsole().SetMinimumLevel(LogLevel.Trace));

// AutoFunctionInvocationLoggingFilter クラスは別途実装してある前提
#pragma warning disable SKEXP0001
//builder.Services.AddSingleton<IAutoFunctionInvocationFilter, AutoFunctionInvocationLoggingFilter>();

Kernel kernel = builder.Build();

・・・
デバッグ時にはとても便利です。
特定の組み込み Plugin のログ出力
大抵の組み込み Plugin のログ出力は ILogger オブジェクトを前提にしているのですが、中にはなぜか ILoggerFactory オブジェクトを受け取ることを前提とした実装になっているものがあります。TextMemoeryPlugin がそれに該当します。
事前にMicrosoft.Extensions.Logging.Consoleのインストールしておき、次のように実装します。
var builder = Kernel.CreateBuilder()
    .AddAzureOpenAIChatCompletion(
        deploymentName: "YOUR_MODEL_ID",
        endpoint: "YOUR_ENDPOINT",
        apiKey: "YOUR_APIKEY"
        );

var loggerFactory = LoggerFactory.Create(builder =>
{
    // 出力するログレベルをセット
    builder.AddConsole().SetMinimumLevel(LogLevel.Trace);
});

builder.Services.AddSingleton<ILoggerFactory, LoggerFactory>();
こっちの方がシンプルですね。
C#限定:ASP.NET Core の WebApplicationBuilder との統合
Semantic Kernel では 作成した Kernel オブジェクトに他のオブジェクトを追加しておくと、自動的に Injection してくれるという DIContainer を利用する仕組みになっています。しかし、.NET では ASP.NET Core アプリケーションなどあらゆるアプリケーションで DIContainer が使用可能なため、DIContainer が少なくとも2つ存在してしまうことになります。
ここでは最も使用される可能性が高い ASP.NET Core アプリケーションと Semantic Kernel との統合について方法を記載します。まずはコードをご覧ください。
このコードの実行にはMicrosoft.SemanticKernel.Plugins.Coreのインストールが必要です。
using Microsoft.SemanticKernel.Plugins.Core;
using Microsoft.SemanticKernel;
using Microsoft.SemanticKernel.Connectors.OpenAI;
//using System.Threading;
using Microsoft.SemanticKernel.ChatCompletion;

var builder = WebApplication.CreateBuilder(args);

builder.Services.AddKernel().AddAzureOpenAIChatCompletion(
    deploymentName: "YOUR_MODELPID",
    endpoint: "YOUR_ENDPOINT",
    apiKey: "YOUR_APIKEY");

#pragma warning disable SKEXP0050
builder.Services.AddSingleton(sp => KernelPluginFactory.CreateFromType<TimePlugin>(serviceProvider: sp));
builder.Services.AddSingleton(sp => KernelPluginFactory.CreateFromType<HttpPlugin>(serviceProvider: sp));

OpenAIPromptExecutionSettings openAIPromptExecutionSettings = new()
{
    ToolCallBehavior = ToolCallBehavior.AutoInvokeKernelFunctions
};

// Add services to the container.

var app = builder.Build();

// Configure the HTTP request pipeline.

app.UseHttpsRedirection();

app.MapGet("/", async (Kernel kernel, CancellationToken c) =>
{
    var chatCompletionService = kernel.GetRequiredService<IChatCompletionService>();

    OpenAIPromptExecutionSettings openAIPromptExecutionSettings = new()
    {
        ToolCallBehavior = ToolCallBehavior.AutoInvokeKernelFunctions
    };

    var result = await chatCompletionService.GetChatMessageContentAsync(
        "今日は何日?",
        executionSettings: openAIPromptExecutionSettings,
        kernel: kernel,
        cancellationToken: c);

    //var result = await kernel.InvokePromptAsync("今日は何日?", cancellationToken: c);
    return result.ToString();
});

app.Run();
まず、builder.Serivce プロパティ(IServiceCollectionクラス)に、 AddKernel 拡張メソッドが使用可能になっていることがわかります。AddKernel 拡張メソッドを使って Kernel オブジェクトの登録をします。
Plugin の登録は builder.Services.AddSingleton メソッドを使っていますが、これは Semantic Kernel に限らない通常の方法です。 KernelPluginFactory を使って Plugin を登録しています。
ここまでが事前セットアップです。リクエストが飛んできたら、DI Container に登録してある Kernel オブジェクトを受け取り、使用するだけです。app.MapGet("/",・async (Kernel kernel, CancellationToken c) =>の箇所です。
少しだけ癖がありますが、Dependency Injection の仕組みをうまく使っていることがわかります。
ASP.NET Core の Minimal API形式 でサンプルを実装しましたが、Minimal API には忌避感がある方もいらっしゃるでしょう。Minimal API を本番の大規模アプリケーションで使う場合のポイントについて別途翻訳記事を書いていますので、是非ご確認ください。
Semantic Kernel と DI Container については公式ブログに解説があります。サンプルプログラムの解説なので読み解くのが少し面倒ですが、こちらも合わせてご確認ください。
余談:Planner はどこいったの?(既存ユーザー向け)
Semantic Kernel を使用してきたユーザーからすると Planner と Memory はどこに行ったのか?と思うことでしょう。ここではこの2つについての現在の状況を説明します。
Planner の終焉
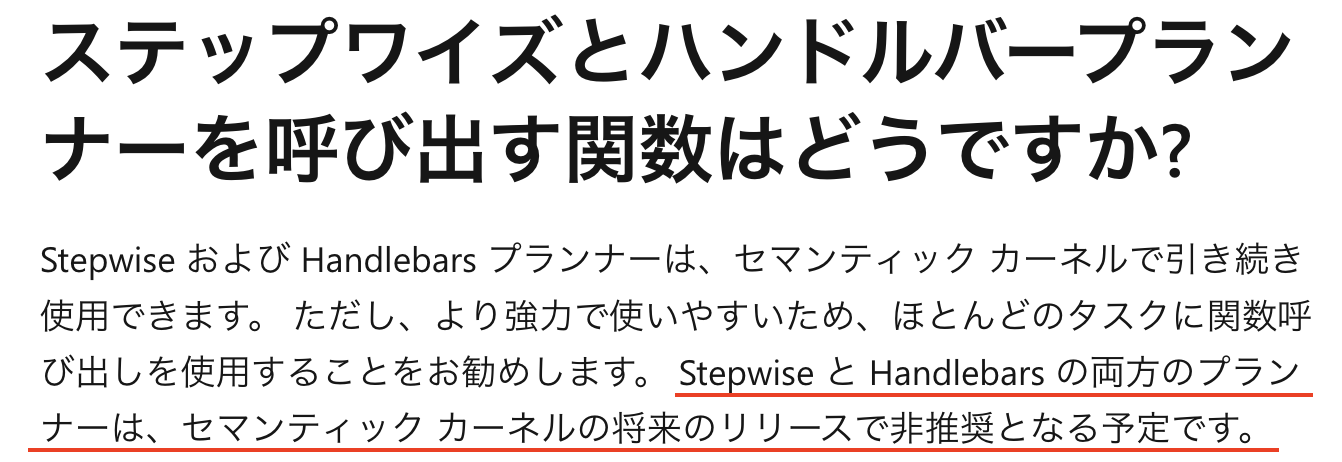
結論から申し上げると、今後 Planner は使用しないでください。非推奨になる予定であることが正式に発表されています。MS Learn に記載がありますのでご確認ください。
ステップワイズとハンドルバープランナーを呼び出す関数はどうですか?
なぜ Planner が非推奨となったのでしょうか。全ては Function Calling です。その圧倒的な精度の高さとパフォーマンスの良さ、極め付けはコスト(料金)の低さです。これらの優位性は Planner を亡き者にしました。
実は Planner は事前定義された巨大なプロンプト(文字列)に過ぎませんでした。メソッドをどの順番で、どんな引数で、何回呼び出すのかを決めるためのプロンプトはとても巨大でした。プロンプトが巨大ということはその分 Token 数も大きくなるのでコストがかかりますし、パフォーマンスも悪化します。そして何よりもどんなにプロンプトをチューニングしても Function Calling の精度の高さには敵わないことがわかってきてしまいました。そこで Semantic Kernel チームは Auto Function Callingを使うことを前提とし、Planner の廃止を決定したのです。
様々な種類の Planner について紹介・実験している記事を Web や書籍で見かけると思いますが、残念ながらその情報はもう古いのです。今から新規で作るアプリケーションでは Planner は使用しないようにしましょう。
Memory
これまで Memory は主に3つの機能を持っている、と紹介されてきました。
- Key-Value ペア形式で文字列を保存。Key値に対してone-to-oneでマッチング(検索)可能
- ローカルストレージに保存し、ファイル名で検索可能
- 文字列を embedding して保存、保存した embedding に対してセマンティック検索可能
Semantic Kernel はこれらの機能を持つ Memory を Core 機能として提供していました。
2024年7月の時点では Memory は1と3の機能が1つになりました。Key-Valueの形式で保存するときに Value とともに embedding した結果も一緒に保存されるようになっています。
また Memory は Core 機能から分離するリファクタリングが進んでいます。様々な Vector Database や検索エンジンは Connector として用意され、Core 機能はそれら Connector と embedding を行う AI モデルへの接続情報を保持する SemanticTextMemory というクラスと、 Memory 用 Plugin を作成するための MemoryBuilder クラスが 残っているだけになっています。
最新の Semantic Kernel のドキュメントでは Vector Database や検索エンジンなどの Core から分離した Memory 用の Connector のことをそのまま Memory Connector と呼んでいます。Azure CosmosDB, Azure AI Search などの Azure 製品だけではなく、Chroma、Pinecorn や Qdrant など様々な外部リソースに対応しています。
これまで提供された機能のうち、ローカルストレージへの保存は Connector が作成されていないため、使用できなくなっています。明確に削除した、というアナウンスが見つからないのでこれについては開発チームに問い合わせる予定です。
それでは Memory の使い方を見てみましょう。
SemanticTextMemory で Memory を操作する
この方法は kernel を使わない方法です。本来 Semantic Kernel は Kernel に Plugin をセットアップして使用しますので、この方法は Semantic Kernel らしくない方法と言えますが、現時点では正式に用意されている方法です。
C#
様々な Connector を使うことで Vector Database や検索エンジンに対して文字列をKey-Valueで保管したり、embeddingした結果に対してセマンティック検索をすることができますが、ここでは Semantic Kernel が用意したメモリ Database である VolatileMemoryStore を使います。
VolatileMemoryStore を使うためには Microsoft.SemanticKernel.Plugins.Memory ライブラリのインストールが必要です。2024年7月の時点ではこのライブラリは Preview です。
Nuget Gallery - Microsoft.SemanticKernel.Plugins.Memory
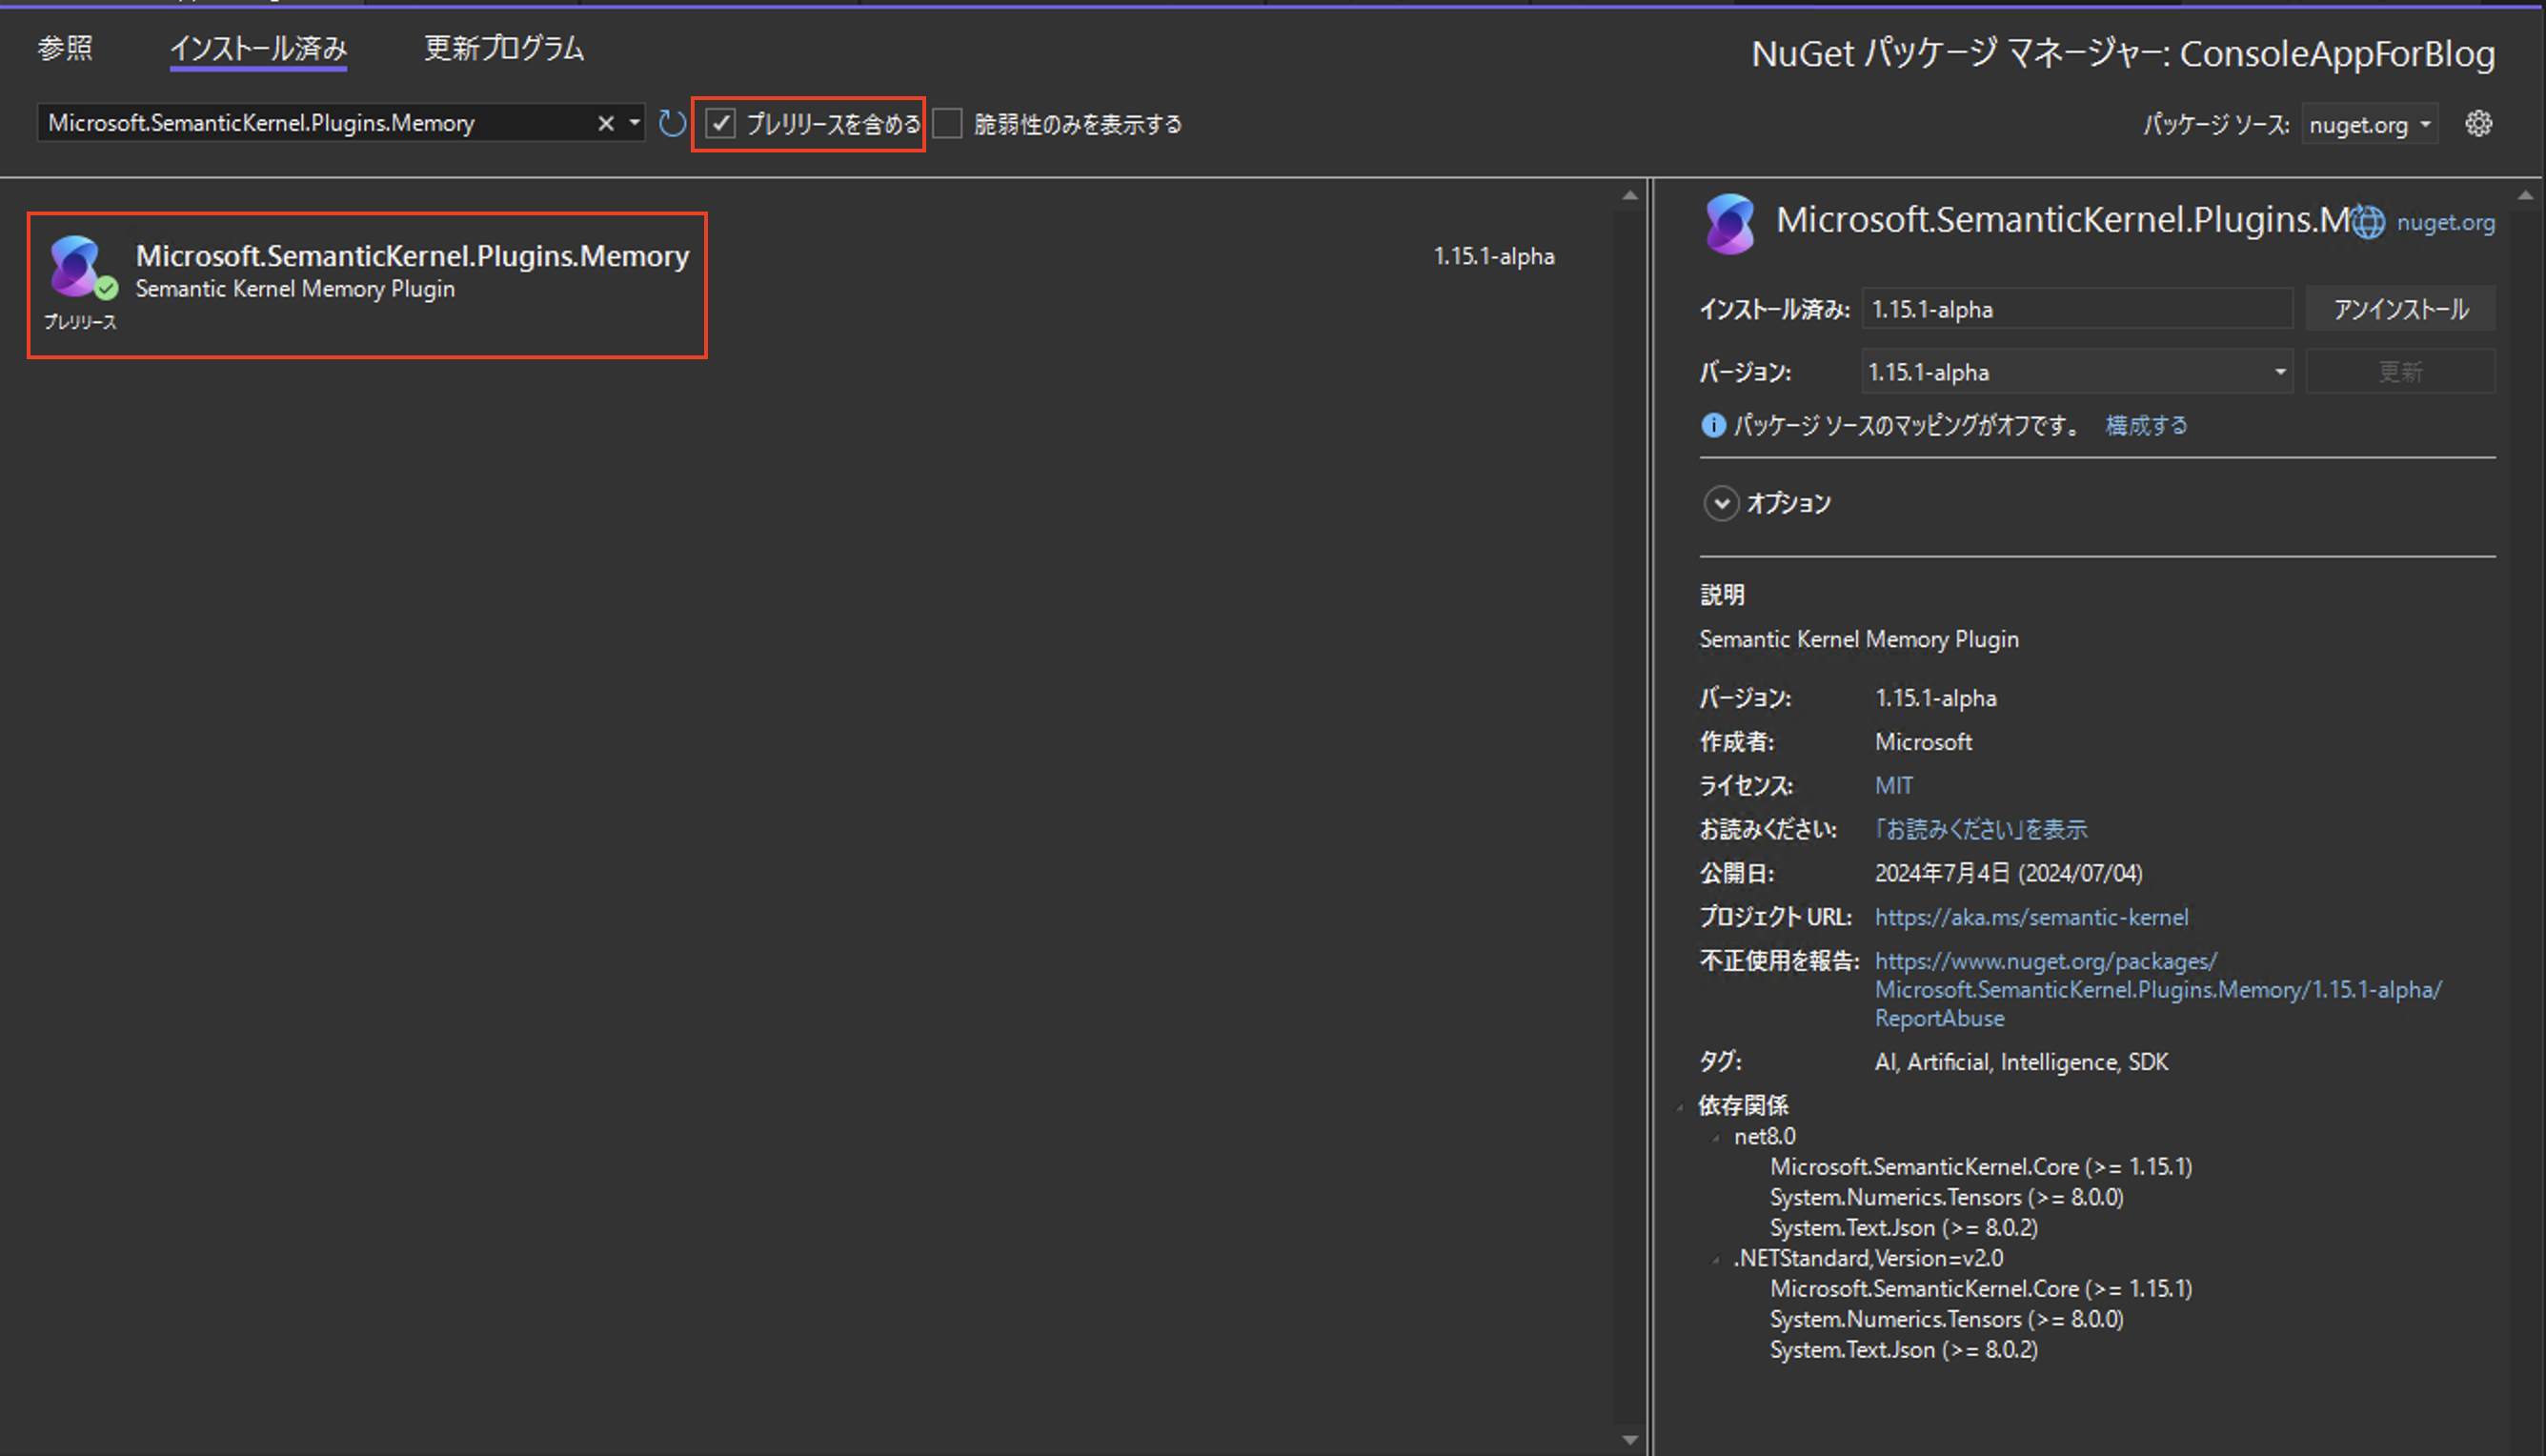
コンソールアプリケーションを新規に作成し、Microsoft.SemanticKernel と Microsoft.SemanticKernel.Plugins.Memory をインストールしたら次のコードを Program.csに貼り付けます。
using Microsoft.SemanticKernel.Connectors.OpenAI;
using Microsoft.SemanticKernel.Memory;

#pragma warning disable SKEXP0001
#pragma warning disable SKEXP0010
#pragma warning disable SKEXP0050

IMemoryStore store = new VolatileMemoryStore();

var embeddingGenerator = new AzureOpenAITextEmbeddingGenerationService(
    deploymentName: "YOUR_EMBEDDING_MODEL_ID",
    apiKey: "YOUR_EMBEDDING_APIKEY",
    endpoint: "YOUR_EMBEDDING_ENDPOINT");

// ここがポイント!
SemanticTextMemory textMemory = new(store, embeddingGenerator);

const string MemoryCollectionName = "aboutMe";

await textMemory.SaveInformationAsync(MemoryCollectionName, id: "info1", text: "My name is Andrea");
await textMemory.SaveInformationAsync(MemoryCollectionName, id: "info2", text: "I work as a tourist operator");
await textMemory.SaveInformationAsync(MemoryCollectionName, id: "info3", text: "I've been living in Seattle since 2005");
await textMemory.SaveInformationAsync(MemoryCollectionName, id: "info4", text: "I visited France and Italy five times since 2015");
await textMemory.SaveInformationAsync(MemoryCollectionName, id: "info5", text: "My family is from New York");

// Keyで検索
MemoryQueryResult? lookup = await textMemory.GetAsync(MemoryCollectionName, "info1");
Console.WriteLine("Memory with key 'info1':" + lookup?.Metadata.Text ?? "ERROR: memory not found");
実行するとこのような結果になります。ちゃんと info1という Key で検索できていますね。

ポイントは、SemanticTextMemory クラスです。このクラスが MemoryStore(今回は VolatileMemoryStore)と、 AI モデルの情報(今回はAzureOpenAITextEmbeddingGenerationService)をコンストラクタで受けとっています。
保存するときは SaveInformationAsync メソッドを使い、Keyでの検索は GetAsync メソッドを使っています。何も難しいところはありませんね。
では、セマンティック検索をしてみましょう。意味合い的に近いものを検索します。次のコードを下に追加します。
// Semantic 検索
await foreach (var answer in textMemory.SearchAsync(
    collection: MemoryCollectionName,
    query: "where did I grow up?",
    limit: 2,
    minRelevanceScore: 0.79,
    withEmbeddings: true))
{
    Console.WriteLine($"Answer: {answer.Metadata.Text}");
}
limit を2とすることで検索した結果を2件だけ受け取るように制限しています。実行すると次のようになります。
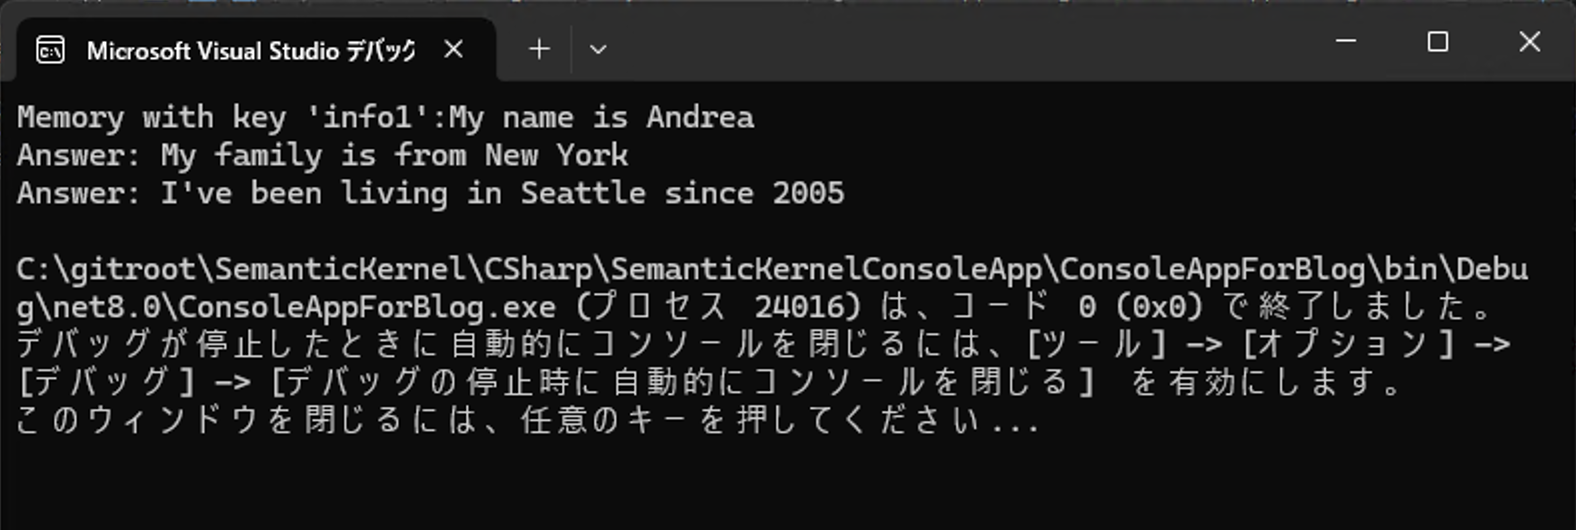
プロンプト「where did I grow up?」に関係の近い結果が2件返却されていることわかります。
2024年7月時点では Java 版の Semantic Kernel には SemanticTextMemory がまだ用意されていません。Memory Connector の対応状況については次のリンクをご確認ください。
TextMemoryPlugin で Memory を操作する
Semantic Kernel の Kernel モデルを素直に使うなら TextMemoryPlugin を使います。
C#
実装はこのようになります。SemanticTextMemory の実装の時と同様に VolatileMemoryStore を使います。
VolatileMemoryStore を使うためには Microsoft.SemanticKernel.Plugins.Memory ライブラリのインストールを忘れずに。
using Microsoft.SemanticKernel;
using Microsoft.SemanticKernel.Connectors.OpenAI;
using Microsoft.SemanticKernel.Memory;
using Microsoft.SemanticKernel.Plugins.Memory;

#pragma warning disable SKEXP0001
#pragma warning disable SKEXP0010
#pragma warning disable SKEXP0050
// Volatile Memory Store - an in-memory store that is not persisted
IMemoryStore store = new VolatileMemoryStore();

var kernel = Kernel.CreateBuilder()
    .AddAzureOpenAIChatCompletion(
        deploymentName: "YOUR_MODELID",
        apiKey: "YOUR_APIKEY",
        endpoint: "YOUR_ENDPOINT")
    .Build();


var embeddingGenerator = new AzureOpenAITextEmbeddingGenerationService(
        deploymentName: "YOUR_EMBEDDING_MODELID",
        apiKey: "YOUR_EMBEDDING_APIKEY",
        endpoint: "YOUR_EMBEDDING_ENDPOINT");

SemanticTextMemory textMemory = new(store, embeddingGenerator);

var MemoryCollectionName = "aboutMe";

// Import the TextMemoryPlugin into the Kernel for other functions
var memoryPlugin = kernel.ImportPluginFromObject(new TextMemoryPlugin(textMemory));

// Save a memory with the Kernel

await kernel.InvokeAsync(memoryPlugin["Save"], new()
{
    [TextMemoryPlugin.InputParam] = "My name is Andrea",
    [TextMemoryPlugin.CollectionParam] = MemoryCollectionName,
    [TextMemoryPlugin.KeyParam] = "info1",
});

await kernel.InvokeAsync(memoryPlugin["Save"], new()
{
    [TextMemoryPlugin.InputParam] = "I work as a tourist operator",
    [TextMemoryPlugin.CollectionParam] = MemoryCollectionName,
    [TextMemoryPlugin.KeyParam] = "info2",
});

await kernel.InvokeAsync(memoryPlugin["Save"], new()
{
    [TextMemoryPlugin.InputParam] = "I've been living in Seattle since 2005",
    [TextMemoryPlugin.CollectionParam] = MemoryCollectionName,
    [TextMemoryPlugin.KeyParam] = "info3",
});

await kernel.InvokeAsync(memoryPlugin["Save"], new()
{
    [TextMemoryPlugin.InputParam] = "I visited France and Italy five times since 2015",
    [TextMemoryPlugin.CollectionParam] = MemoryCollectionName,
    [TextMemoryPlugin.KeyParam] = "info4",
});

await kernel.InvokeAsync(memoryPlugin["Save"], new()
{
    [TextMemoryPlugin.InputParam] = "My family is from New York",
    [TextMemoryPlugin.CollectionParam] = MemoryCollectionName,
    [TextMemoryPlugin.KeyParam] = "info5",
});

var result = await kernel.InvokeAsync(memoryPlugin["Retrieve"], new KernelArguments()
{
    [TextMemoryPlugin.CollectionParam] = MemoryCollectionName,
    [TextMemoryPlugin.KeyParam] = "info5"
});

Console.WriteLine("Memory with key 'info5':" + result.GetValue<string>() ?? "ERROR: memory not found");
Console.WriteLine("Ask: where did I grow up?");

result = await kernel.InvokeAsync(memoryPlugin["Recall"], new()
{
    [TextMemoryPlugin.InputParam] = "Ask: where did I grow up?",
    [TextMemoryPlugin.CollectionParam] = MemoryCollectionName,
    [TextMemoryPlugin.LimitParam] = 2,
    [TextMemoryPlugin.RelevanceParam] = 0.79,
});

Console.WriteLine($"Answer: {result.GetValue<string>()}");
この実装、ぱっと見て次の箇所に違和感を持つと思います。
new () {
    [TextMemoryPlugin.InputParam] = "Ask: where did I grow up?",
    [TextMemoryPlugin.CollectionParam] = MemoryCollectionName,
    [TextMemoryPlugin.LimitParam] = 2,
    [TextMemoryPlugin.RelevanceParam] = 0.79,
}
これは、KernelArugments オブジェクトが保持する Dictionary に値を Key-Value 形式でセットしているだけです。
例えば TextMemoryPlugin.InputParam は文字列 "input" が const で定義してあるだけに過ぎません。つまり Recall メソッドの input 引数に値 "Ask: where did I grow up?" をセットする、という意味です。
TextMemoryPlugin での検索結果は、最初の1件しか返却されません。そのため、 limit パラメータは全く無意味です。いずれこの1件しか返却されないと言う挙動は変更されるかもしれません。使用するときはその点にご留意だくさい。
TextMemoryPlugin の Java 実装ですが、まだ用意がありません。というのも、TextMemoryPlugin は結局内部で SemanticTextMemory を使用しているからです。SemanticTextMemory がリリースされれば TextMemoryPlugin もリリースされると思われますので、それまでお待ちください。
Memory をプロンプトと一緒に使う
ここまでご紹介した方法は Memory からの検索を手動で行い、その結果を表示しているだけです。本番アプリケーションでどのように使うのかがちょっとイメージしづらい箇所があると思います。
Memory への保存については悩む箇所は無いでしょう。チャット形式の場合はユーザーが入力したプロンプトと、AI モデルから得た生成結果をそれぞれ Memory に保存すれば会話履歴の保存になります。問題は Memory からの検索をプロンプトに応じて行う場合です。ここまでご紹介した方法は SemanticTextMemory オブジェクトを使って直接 Memory を操作するか、TextMemoryPlugin 越しに Memory を操作するしかしていません。 プロンプト共に検索をしていないのです。
プロンプトと共に検索を行う場合、次のように動的プロンプトを使うことになります。
const string RecallFunctionDefinition = @"
Consider only the facts below when answering questions:

BEGIN FACTS
About me: {{recall 'where did I grow up?' collection='aboutMe' relevance='0.79'}}
About me: {{recall 'where do I live now?' collection='aboutMe' relevance='0.79'}}
END FACTS

Question: Do I live in the same town where I grew up?

Answer:
";
recall という KernelFunction を呼び出しているのがお分かりいただけるかと思います。そして、その上下を BEGIN FACTS と END FACTS で囲っています。これを事実として、質問にはこの事実だけを使って答えること、一番最初の行に制限が書かれています。
この例では、recall に対して固定の文字列でセマンティック検索した結果を使っています。これを動的にすることはもちろん可能です。
const string RecallFunctionDefinition = @"
Consider only the facts below when answering questions:

BEGIN FACTS
About me: {{recall $search1 collection='aboutMe' relevance='0.79'}}
About me: {{recall $search2 collection='aboutMe' relevance='0.79'}}
END FACTS

Question: {{$input}}

Answer:
";
動的プロンプトのご紹介で注意として記載しましたが、この例のように変数と Plugin 呼び出しの両方を動的プロンプトで行う場合、ChatCompletionService.GetChatMessageContentAsync メソッドは使用できません。Kernel.CreateFunctionFromPrompt メソッドを使ってプロンプトを KernelFunction に変換し、Kernel.InvokeAsync メソッドを使って KernelArguments オブジェクトを引数に渡して実行しなければなら無いことに注意してください。
var aboutMeOracle = kernel.CreateFunctionFromPrompt(RecallFunctionDefinition, new OpenAIPromptExecutionSettings() { MaxTokens = 100 });

result = await kernel.InvokeAsync(aboutMeOracle, new()
{
    ["search1"] = "where did I grow up?",
    ["search2"] = "where do I live now?",
    ["input"] = "Do I live in the same town where I grew up?"
});

Console.WriteLine("Ask: Do I live in the same town where I grew up?");
Console.WriteLine($"Answer: {result.GetValue<string>()}");
Memory の Database として PostgreSQL を使用する
メモリ内部で Memory の機能を使うのはテストとしては良いのですが、実際には Database や検索エンジンを使うことになります。個々の製品に対して Vector 機能を使えるようにセットアップしなければならない場合がありますが、やり方は当然それぞれの製品よって異なります。ここでは Azure Database for PostgreSQL でのセットアップと、実装をご紹介します。
1. azure.extensions で vector をインストールする
PostgreSQL で Vector データを扱えるように拡張機能をインストールする必要があります。Azure Portalのサーバーパラメーターをクリックし、パラメーター名が azure.extensions を検索します。 azure.extensions の VECTOR にチェックを入れてから保存します。
2. データベースで vector を作成する
次に使用するデータベースで vector 拡張を Create します。 PostgreSQL に接続し、次のコマンドを叩きます。
CREATE EXTENSION vector;
もしくは pgAdmin を使っている場合は次のようにGUIでセットアップすることもできます。
3. MemoryStore として PostgreSQL を指定する
次のように Nuget で PostgreSQL 用の ライブラリをインストールします。
実際に使用するときの実装は次のようになります。
using Npgsql;
using Microsoft.SemanticKernel.Connectors.Postgres;

・・・

NpgsqlDataSourceBuilder dataSourceBuilder = new(<YOUR_CONNECTION_STRINGS>);
dataSourceBuilder.UseVector();
NpgsqlDataSource dataSource = dataSourceBuilder.Build();
IMemoryStore store = new PostgresMemoryStore(dataSource, vectorSize: 1536, schema: "public");
4.実行結果
試しに文字列を保存してみると、このようになります。元の文字列と、Vector化された結果の両方が格納されます。
Kernel Memory ?
Semantic Kernel と Memory で検索すると、 Kernel Memory という情報にヒットします。
これは Micorosft の OSS ですが、上で説明した Semantic Kernel の Memory ではありません。Semantic Kernel の Memory をベースにした別の製品です。Semantic Kernel の Memory をさらに高機能の発展させているものですが、あくまでも研究段階のものです。本番用アプリケーションで使用する場合は注意してください。
Semantic Kernel から使えるように Plugin の用意があります。また、Webサービスとして稼働することができるので、とても柔軟性が高い構成を取ることができます。興味がある方は GitHub のリポジトリをご確認ください。
最後に
Semantic Kernel の進化は AI モデルの進化とともにあるため、これからも大きく変動していく可能性が高いです。MS Learn のドキュメントの整理がなかなか追いつかないのでソースを確認していく必要があるのはハードルが高いですが、使いこなせると大変便利なものです。AI モデルを使うエンタープライズアプリケーションを作成するときの強い味方となってくれるでしょう。是非今後も動向をチェックしてください。


